Steel bar installation pitfall avoidance guide
This Steel bar installation pitfall avoidance guide is written with the aim of ensuring every construction project meets standards, is delivered complete and safe, and provides the public with secure usage and habitation. Those of us in the building trade know that installing steel reinforcement is like building the “skeleton” of a house. If this work is done poorly, the subsequent troubles can pile up like mountains! Whether it’s a towering skyscraper or a humble village bridge, reinforcing steel bears the primary load. Only by working in tandem with concrete can the structure remain stable. If the steel is installed crookedly, omitted, or poorly joined, the building may crack, deform, or even collapse under severe conditions. This jeopardises both our workers’ safety and the homes of ordinary people. So today we’ll break down common pitfalls in rebar installation, discuss prevention and rectification methods – all hard-earned on-site experience. Everyone, take note!
Common Defects in Reinforcing Steel Installation
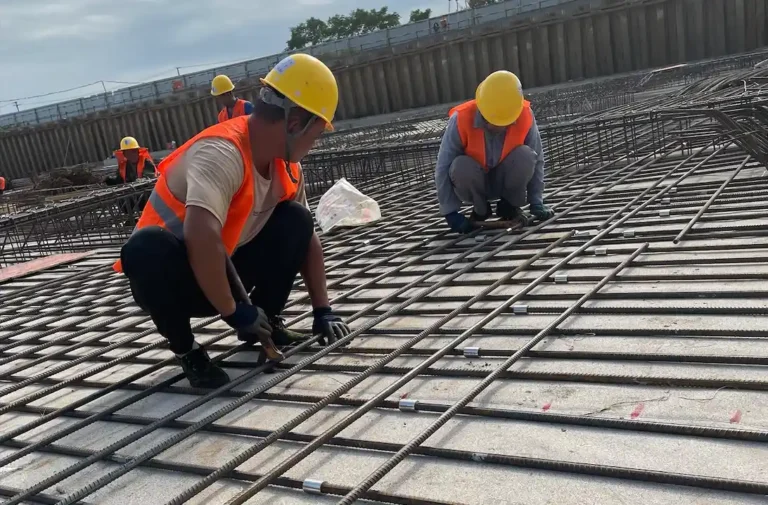
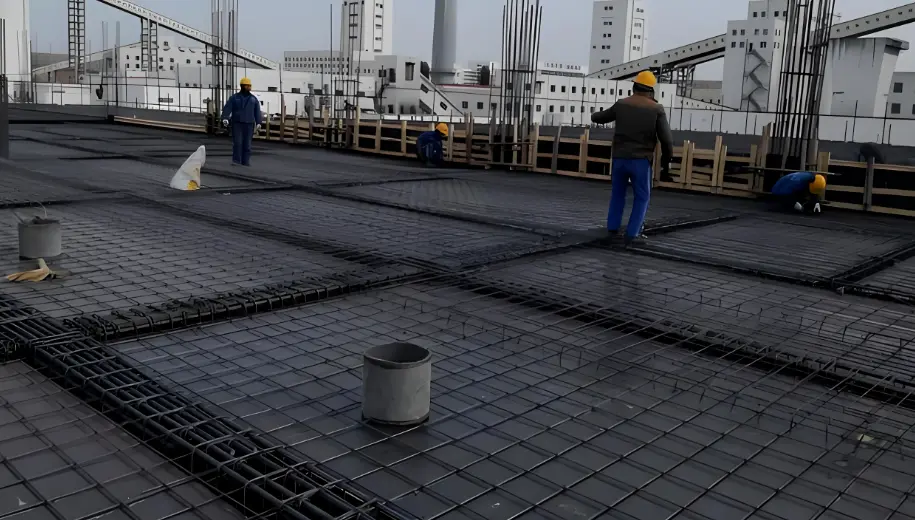
1. The reinforcement skeleton has become distorted.
When we’re tying the steel reinforcement framework on site, the most frustrating part is fitting it into the formwork afterwards. Either it won’t go in, or forcing it in leaves the formwork covered in scratches, delaying the next stage of work. Who’s to blame for this? On one hand, it’s down to the rebar fabricators not getting the dimensions spot on – say, a bend angle off by a few centimetres or a length that’s a bit short. That’s bound to cause problems when we come to assemble it on site. On the other hand, it’s down to us being careless during installation. Several rebar ends weren’t aligned properly, and when we were tying them up, we didn’t spot that one piece was off-centre. In the end, the frame ended up all crooked and uneven, not matching the drawings at all. We had to take it all apart and re-tie it – what a waste of time!
2.The protective layer thickness of steel bars is out of control
If the protective layer thickness isn’t accurate, the reinforcement is prone to rusting after concrete pouring, causing structural failures within a few years. What we often encounter on site is that before pouring concrete, the protective layer is either too thick or too thin. Why does this occur? Either the mortar spacers themselves are incorrectly sized—for instance, the design calls for 3cm, yet the spacers measure only 2cm—or insufficient spacers are used. In some areas, spacers are placed only every metre or two, allowing the reinforcement to sink under pressure and inevitably compromising the cover thickness. This is particularly problematic when pouring cantilever slabs such as balconies or eaves: if the spacers are poorly positioned and the reinforcement settles, issues are bound to arise later.
3. The external reinforcement bars of the columns have shifted
The reinforcing bars protruding from the top of the columns should have been spliced with those of the upper columns, but they were often misaligned by a considerable margin, rendering them incompatible. This is no trivial matter! During self-inspections, they sometimes appeared neatly aligned, yet if not properly secured, subsequent workers moving materials or erecting scaffolding could displace them upon contact. Then when pouring concrete, the vibrator jostles the bars out of alignment. If nobody straightens them promptly, once the concrete sets, there’s no adjusting them. You’re left with no choice but to chisel out the concrete and redo the work – a time-consuming and costly affair.
4.Framework beam reinforcement bars deviating from alignment
The protruding reinforcement bars at both ends of the precast frame beam were intended to be welded together with the column’s reinforcement bars (typically using fillet welding). However, the reinforcement bars were misaligned, preventing proper contact between the two steel bars and rendering welding impossible. This was most likely caused by the dowel bars not being securely fixed. During concrete pouring, workers stepping on them or the impact of vibrators caused the dowels to either bend upwards or skew sideways. The issue was only discovered after the concrete had been poured, and no amount of adjustment could return them to their original position. Ultimately, additional reinforcement bars had to be added as a remedy, which was both troublesome and compromised the structural strength.
5. Percentage of steel bar joint area within the same connection section exceeds the specified limit
The specifications clearly state that within a section spanning 30 times the diameter of the load-bearing reinforcement (minimum 500 millimetres), the area of spliced reinforcement must not exceed a specified proportion of the total cross-sectional area. Yet on site, to save time, splices are sometimes clustered together. Why does this occur? Some workers are unaware that joints in areas like the lower chords of roof trusses or arch tie rods must be welded or connected using high-quality steel sleeve couplers, not simply tied. Others miscalculate material lengths during preparation, resulting in all cut bars being identical in size. Consequently, whether using welding, tying, or couplers, joints inevitably cluster in one location. Others fail to distinguish between tension and compression zones, haphazardly placing joints. Particularly when using couplers, failure to tighten or inspect them as required leads to excessive joints per section, inevitably compromising structural integrity.
6. Rebar pokin out – ugly rust starter
After the concrete has been poured, exposed reinforcement bars protrude from the surface. This phenomenon, known as exposed reinforcement, is not only unsightly but also leaves the bars vulnerable to corrosion. During our on-site inspection, we identified several causes: either the spacers were too sparse, or in some areas, no spacers were used at all, leaving the reinforcement directly against the formwork; alternatively, the reinforcement cage was tied with excessive dimensions, causing localised contact with the formwork, which then exposed the reinforcement after concrete placement; furthermore, during vibration, the vibrator collided directly with the reinforcement, displacing it and loosening the ties, inevitably leading to exposed reinforcement.
7. Reinforcement substitution for short weight
Sometimes when raw materials are insufficient, we have to substitute with different specifications of stirrups. But if the substitution isn’t calculated properly, the cross-sectional area of the stirrups ends up smaller than designed – that’s what we call “short-changing”. A common on-site error is considering the dimensions of the bent reinforcement during substitution but neglecting to amend the material list. Consequently, stirrups are fabricated according to the original specifications, resulting in inadequate dimensions and insufficient load-bearing capacity. For instance, if the bent reinforcement is enlarged, the stirrups must be adjusted accordingly. However, if overlooked, the stirrups remain unchanged in size, inevitably causing issues.
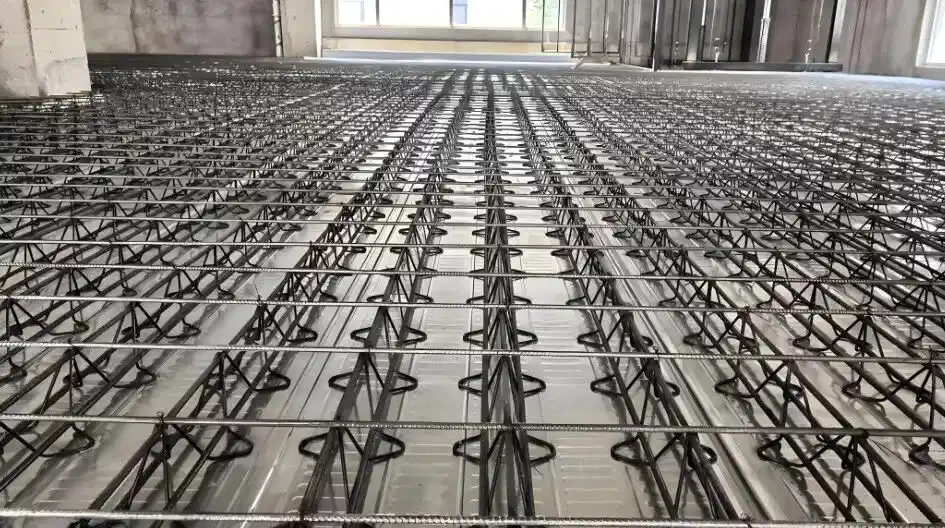
8. The stirrup spacing is all over the place
The stirrup spacing indicated on the drawings is an approximate figure. If we don’t calculate it accurately on site and simply tie using the approximate value, the final spacing will either be too wide or too narrow. Some areas may end up with an extra stirrup, while others may be missing one. Take column stirrups, for instance. Where drawings specify 200mm spacing, if you bind them by feel without first marking points on the longitudinal bars, you might end up with 180mm gaps in some places and 220mm in others. This creates an unstable framework with uneven stress distribution.
9. Failed lap splices due to poor tying
The lap joints of the reinforcing bars were not securely tied, causing them to come loose upon the slightest jostle during handling, rendering the tying effort futile. On site, we sometimes prioritise speed, tying only one lap joint instead of the required three ties at the centre and both ends. Furthermore, some reinforcing bars were handled with careless force during transport—being thrown or dropped roughly—resulting in bent joints and loosened connections. Ultimately, this prevents proper load transfer between bars, compromising the structural integrity of the entire framework.
10. Lapping stirrup ends in the same location
When tying the stirrups around the columns, ensure all joints face in the same direction without being staggered. This is a common oversight. Primarily, workers fail to pay attention during tying, binding one after another in sequence without considering the need to rotate the joints to stagger them. Do not underestimate this matter; joints aligned in the same direction compromise the column’s seismic resistance. The code explicitly requires them to be staggered, so we must not be careless on site.
11. Rebars not installed as per drawings
Sometimes, after the reinforcement has been tied, one glances at the drawings only to find several bars missing – this is what we call ‘going missing’. This is often because the drawings weren’t fully understood before construction began, leading to confusion over the installation sequence of different rebar grades and resulting in omissions during material preparation. Alternatively, bars may be lost during on-site handling without anyone checking, only to be discovered after the concrete has been poured. The only remedy is to chisel out the concrete and add the missing reinforcement, wasting both labour and materials. For instance, secondary beam reinforcement marked on the drawings might be omitted during tying if not cross-checked on site, inevitably causing problems later on.
12. Exposed stirrup hooks in thin slabs
The slab is inherently thin, yet the height of the rebar hooks when erected exceeds the slab’s thickness. By convention, the hooks are tied facing upwards, resulting in them protruding after concrete pouring. Take bathroom slabs, for instance, which are merely 8 centimetres thick, while the rebar hooks measure 10 centimetres. Tying them upward inevitably causes exposure, which not only looks unsightly but also hinders subsequent tiling work, necessitating hammering the hooks flat before proceeding.
Comprehensive Preventive Measures
1、Precision in Installation and Operation
- Before tying the reinforcing bars, align the ends of multiple bars precisely. Measure accurately with a tape measure – even a 1-millimetre discrepancy is unacceptable. This is particularly crucial for the corner bars of the framework, which must be perfectly aligned; otherwise, the tied structure will inevitably be crooked.
- When tying stirrups, first mark intervals on the longitudinal bars with chalk. For instance, if spacing is 200mm, mark points every 200mm and tie precisely to these marks to ensure accurate spacing. When tying flat steel mesh, in addition to single-direction ties on one side, add cross-ties every metre, securing them tightly to prevent mesh displacement during concrete pouring.
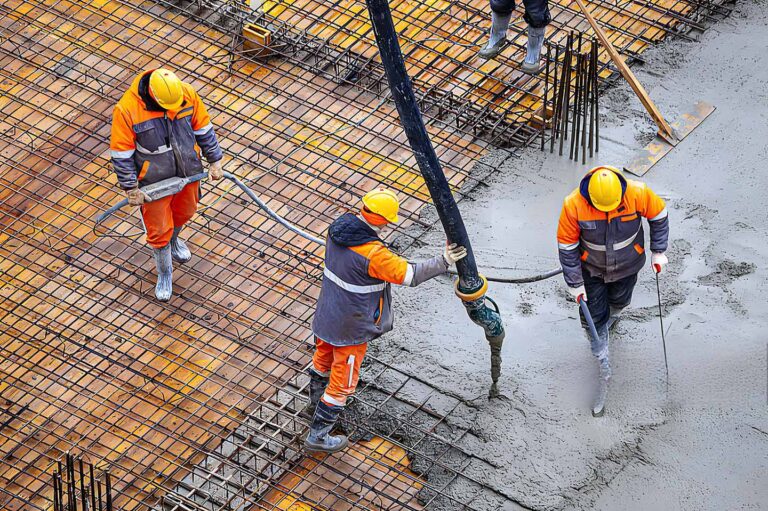
- During concrete pouring, assign a dedicated reinforcement worker to monitor the process. Ensure the vibrator operator does not press the vibrator directly against the reinforcement bars; maintain a minimum distance of 5 centimetres. Should any reinforcement bars become misaligned, halt the pouring immediately. Use a crowbar to realign them before resuming the pour.
2、Strict quality control of materials and components
- Upon arrival of reinforcing steel, first inspect the certificate of conformity and quality documentation, then examine the surface for rust or cracks. Reject any non-compliant bars outright. Take samples as per regulations for mechanical testing; bars failing tensile or yield strength tests must be discarded without exception – do not consider using them as makeshift substitutes.
- When fabricating mortar spacers in-house, ensure the cement-to-sand ratio is correct and the strength is adequate—they must not crumble under pressure. Adhere strictly to the design-specified cover thickness; for instance, a 3cm cover requires a 3cm spacer—do not rely on estimation. During placement, position spacers at 800mm intervals for slabs and two per metre for columns, ensuring the reinforcement is fully supported and does not sink.
- Upon delivery of stirrups, verify dimensions and shape—check whether 135-degree hooks are sufficiently long and free from warping. Reject non-compliant items and request replacements from the manufacturer. Never compromise on quality, as substandard stirrups will result in irregular reinforcement frameworks.
3、Construction Management ‘Refinement’
- Prior to commencement, convene a drawing review meeting with reinforcing steel workers, carpenters, and concrete workers present to clarify all ambiguities in the plans—such as reinforcement anchorage lengths and joint locations—to prevent errors arising from misunderstood specifications. Subsequently, establish a construction schedule detailing which sections of reinforcement are to be tied on which days, with clear assignment of responsibilities.
- Technical briefings must be practical, not merely theoretical. Use reinforcement samples to demonstrate tying and fixing methods on-site, instructing workers on prohibited joint locations and how to calculate stirrup spacing. Conduct regular training sessions, particularly for new recruits, pairing them with experienced workers to prevent unskilled personnel from operating blindly.
- Appoint a quality supervisor on-site to monitor rebar installation. Correct any errors or omissions immediately upon discovery—do not wait until after concrete pouring for rectification. Encourage workers to report issues promptly, such as insufficient spacers or incorrect rebar dimensions, and coordinate solutions without delay.
4、Quality inspection with no blind spots
- Upon completion of rebar tying, the team shall conduct a self-inspection to verify rebar specifications, quantity, spacing accuracy, and staggered joints. For instance, when measuring the position of column projection rebars with a tape measure, any deviation exceeding 5 millimetres must be rectified. Following self-inspection, cross-checking by other teams is required. For example, carpenters should verify whether rebar clearance from formwork is adequate and whether any rebar is pressing against the formwork.
- During specialised inspections, employ professional tools such as concrete coverthickness gauges to measure slab cover. Immediately add spacers where cover is insufficient. Focus particularly on column-beam junctions and cantilever slab reinforcement—areas prone to errors—ensuring no detail is overlooked.
- Maintain thorough records: document rebar delivery times, test report numbers, installation dates, and inspection outcomes in a logbook. This enables tracing responsibility for any subsequent issues and identifies faulty procedures, facilitating lessons learned to prevent recurrence.