Precast Concrete Grouted Sleeve Connection: Key Control Points
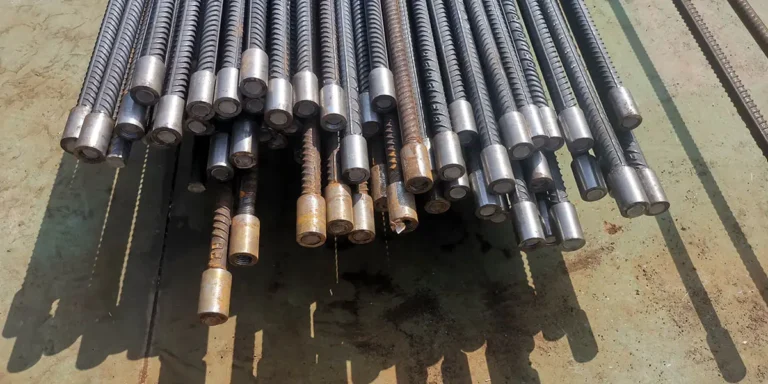
Precast Concrete Grouted Sleeve Connection technology involves inserting a single ribbed steel bar into a metal sleeve and injecting grout mixture. As the mixture hardens, it forms an integral structure, achieving a steel bar butt joint connection that transmits forces.
Its development in China began with successful research and development in 2009, with the first application occurring in 2010 at the COFCO Vanke Holiday Scenery prefabricated shear wall buildings D1# and D8# in Beijing (notable feature: the world’s first steel machined sleeve). In recent years, similar products have been developed domestically, including cast iron, cast steel, and steel variants formed through rolling or extrusion processes.

1、Grouted Sleeve Connection Technology
Functions and Key Elements of Grouting Sleeves:
- The grout sleeve serves as the critical connection component for grout-filled connections, acting as the physical carrier for such joints. Its primary function is to transmit forces (repeated tensile-compressive cycles).
- Current Chinese Standard: “Grouted Sleeve for Reinforcing Bar Connections” JG/T398-2012. A revised edition is currently under development.
- Material: The foundation for sleeve parameter design, including ductile iron, various steels…
- Basic performance requirements: Strength, elongation, spheroidization rate…
- Key focus in manufacturing: Material stability. Examples include casting defects, spheroidization rate, and changes in elongation after extrusion processing for various steels…
Dimension and Parameters:
The dimensional parameters designed based on material properties include: length, outer diameter, and grooves (minimum wall thickness, minimum inner diameter, groove shape). These parameters are mutually constrained.
For example, length is related to the shape and number of grooves (shear grooves) and also to the strength of the matching grout material. JG/T398 specifies that the grout connection (anchorage length) should not be less than 8d. This requirement was established based on matching tests conducted with the sleeve (material and groove) and grout material (85MPa) at the time, incorporating a safety margin.
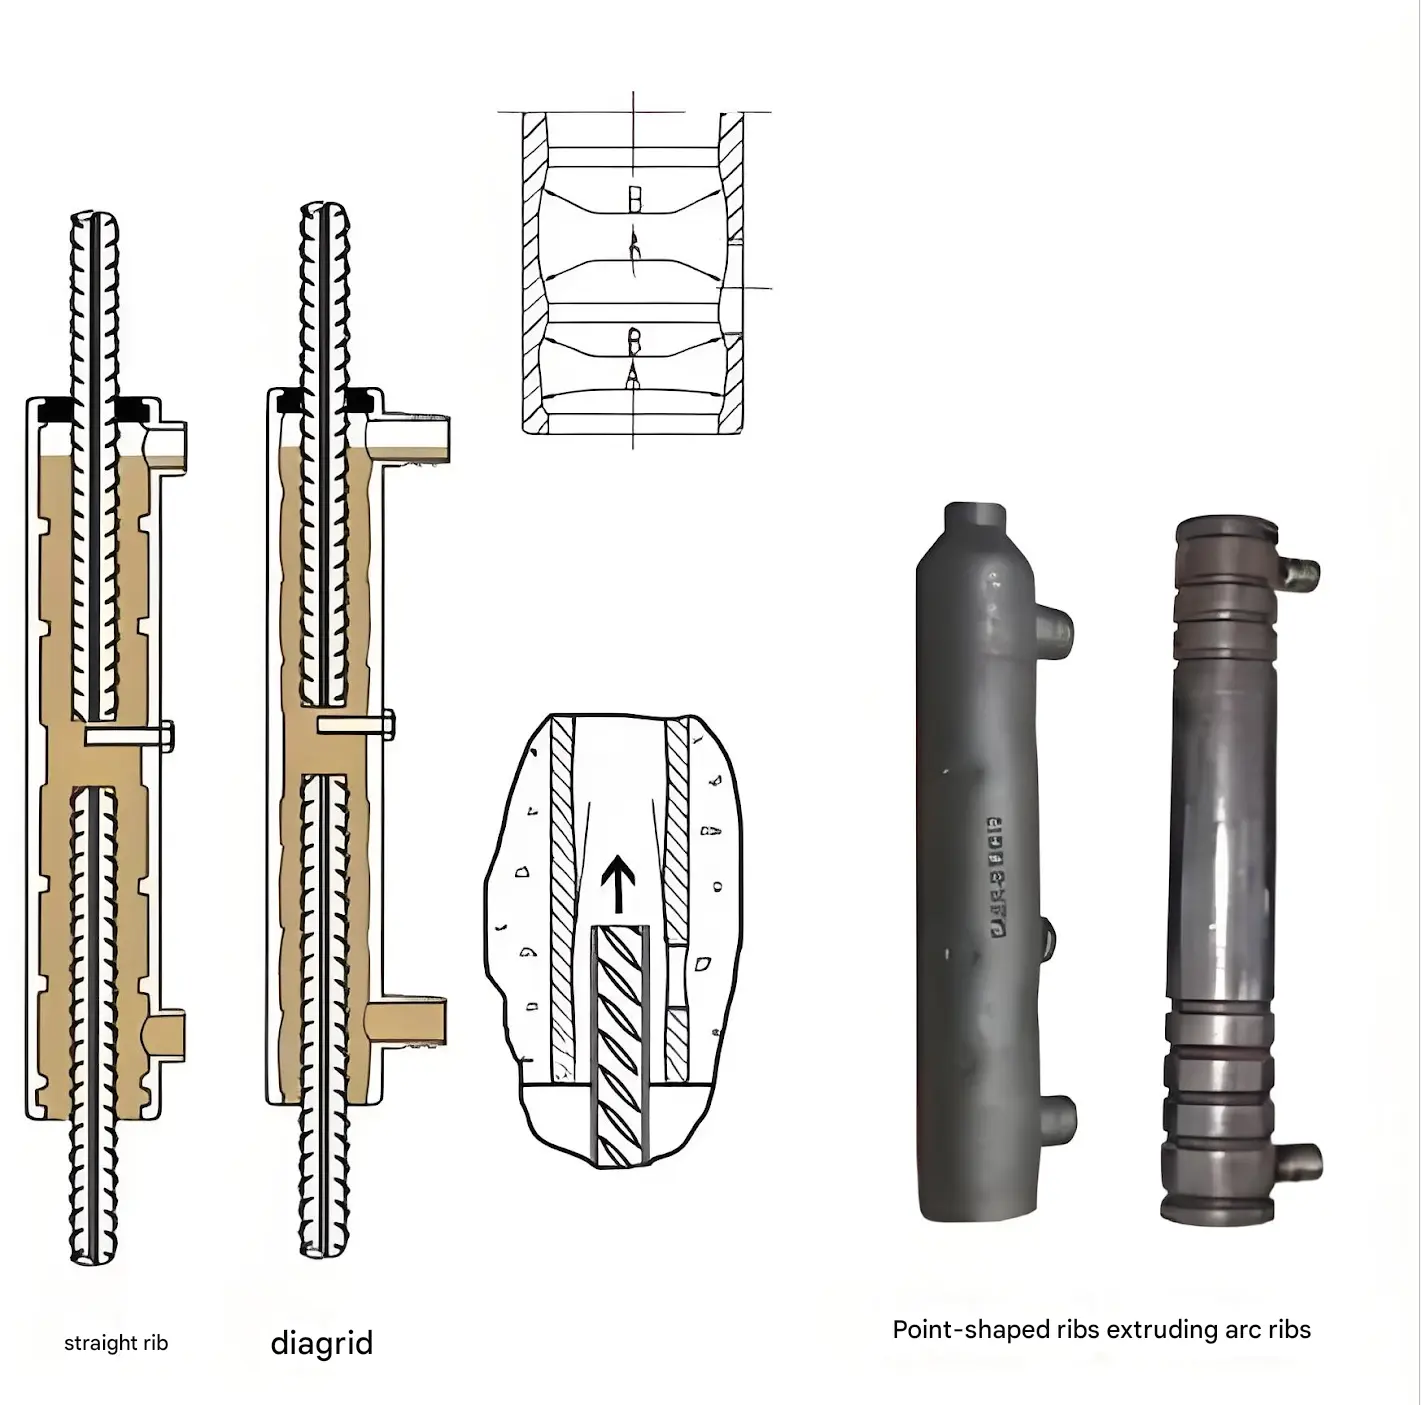
For example, corresponding to the groove are the protruding ribs: straight ribs, inclined ribs (steep slope, good load-bearing, easy rebar insertion, easy grout flow), as well as arc ribs, point ribs, etc. The purpose is to increase “grip force and anchoring force.” The number of grooves and their parameters (height*width) should be measurable.
Sleeves classified by manufacturing method:
- Cast sleeves.
- Machined sleeves—further subdivided into turning, extrusion (rolling) forming, forging, or composite processing combining the aforementioned methods.
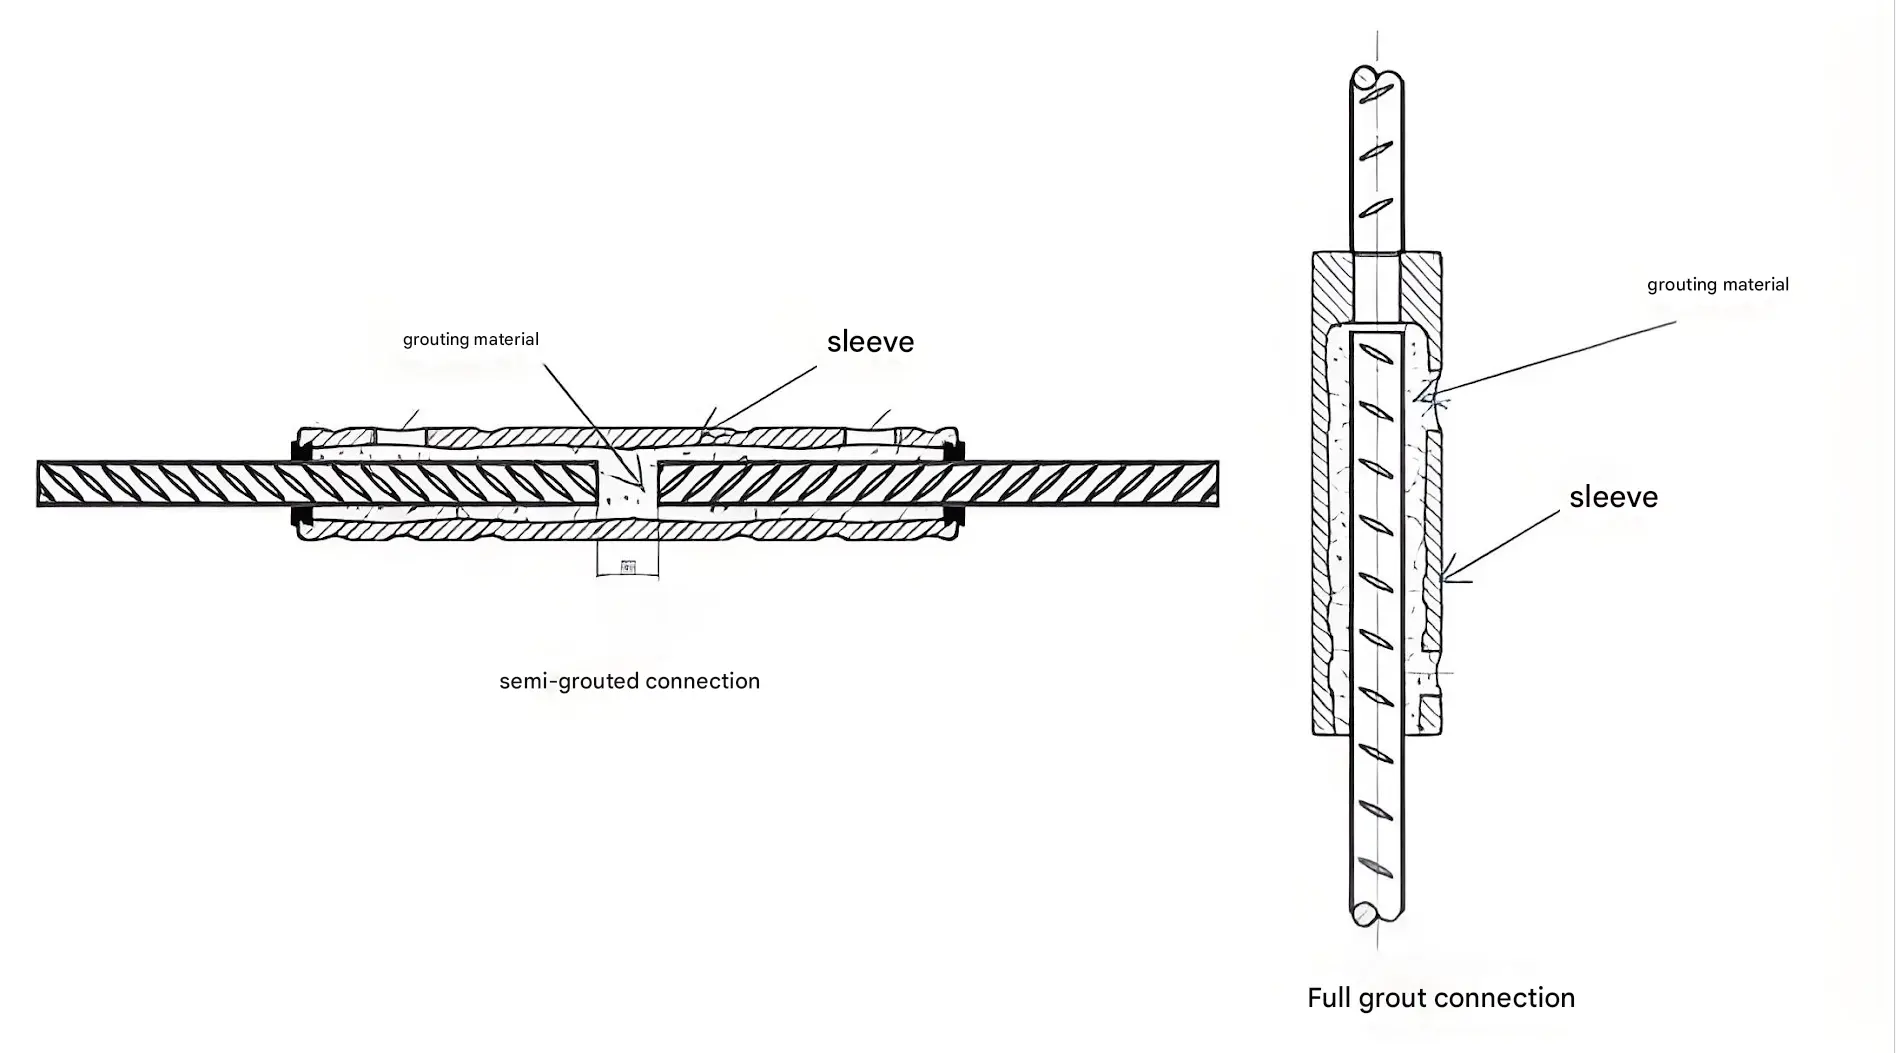
Sleeves are classified by structural form:
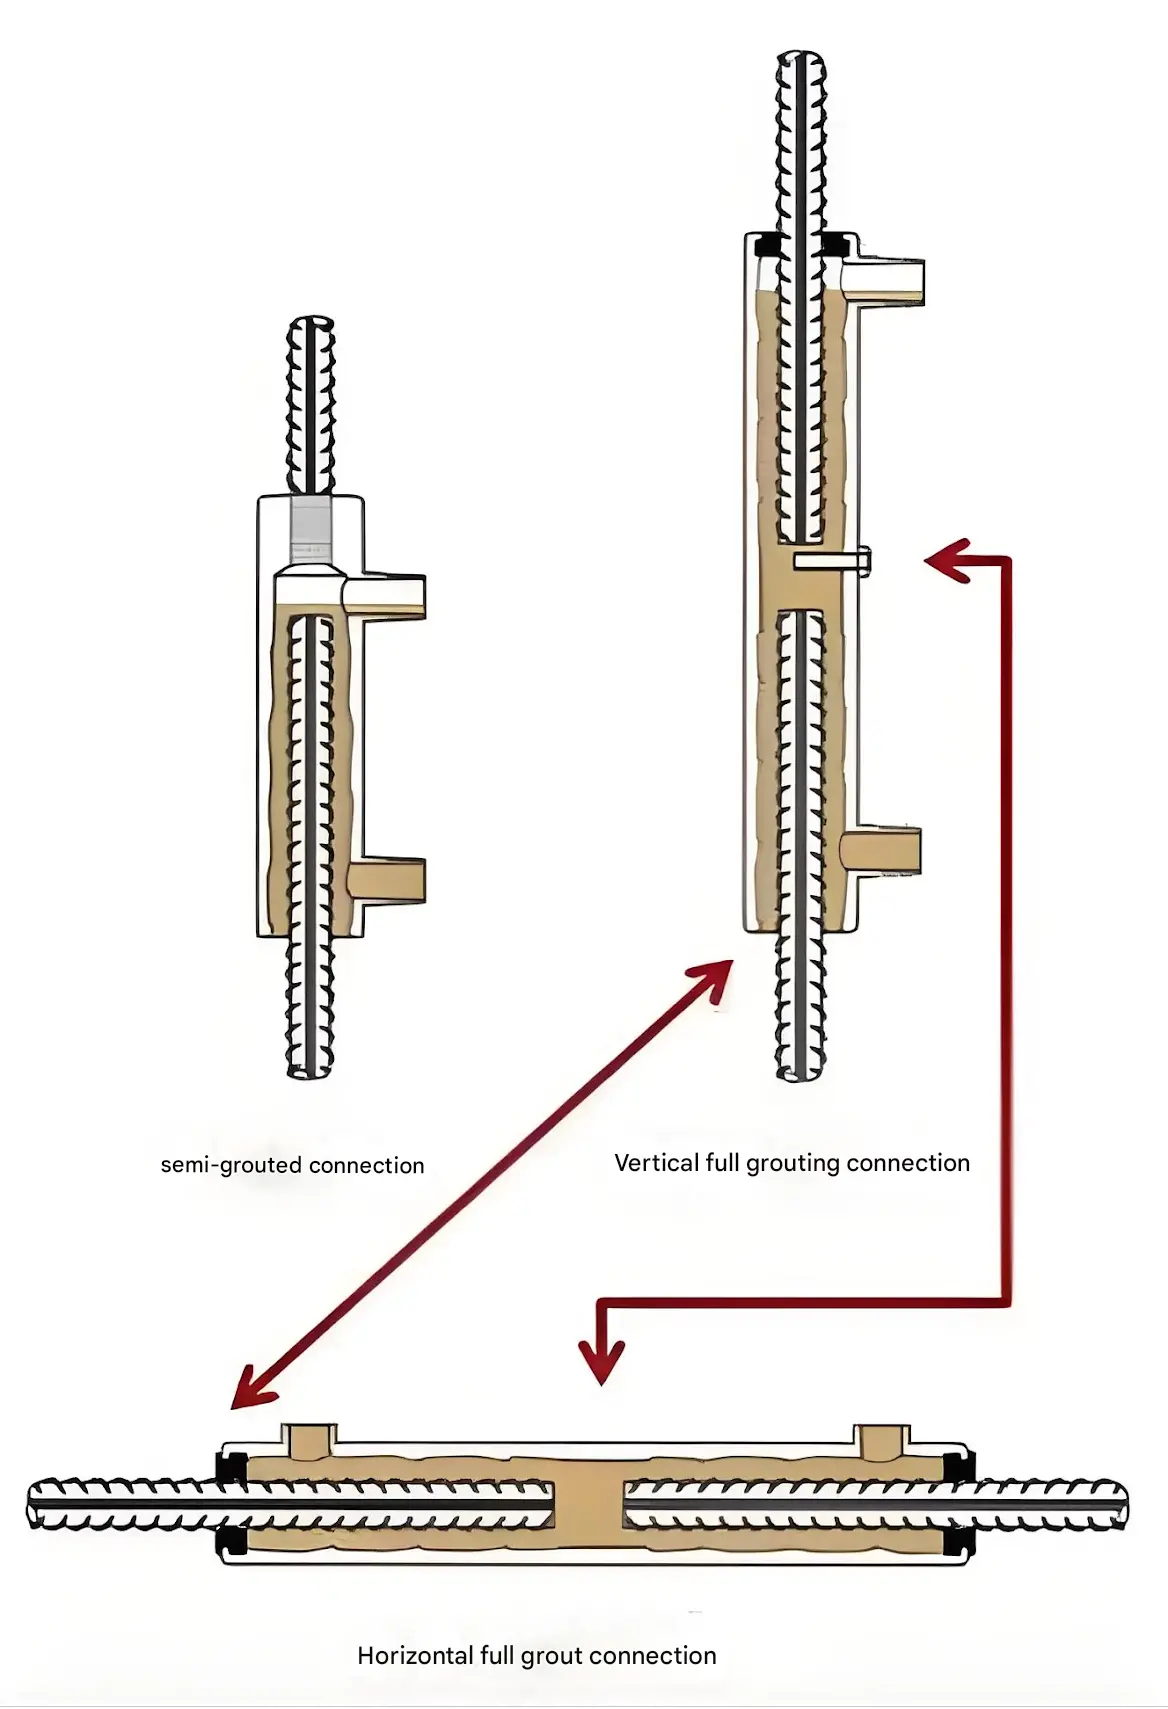
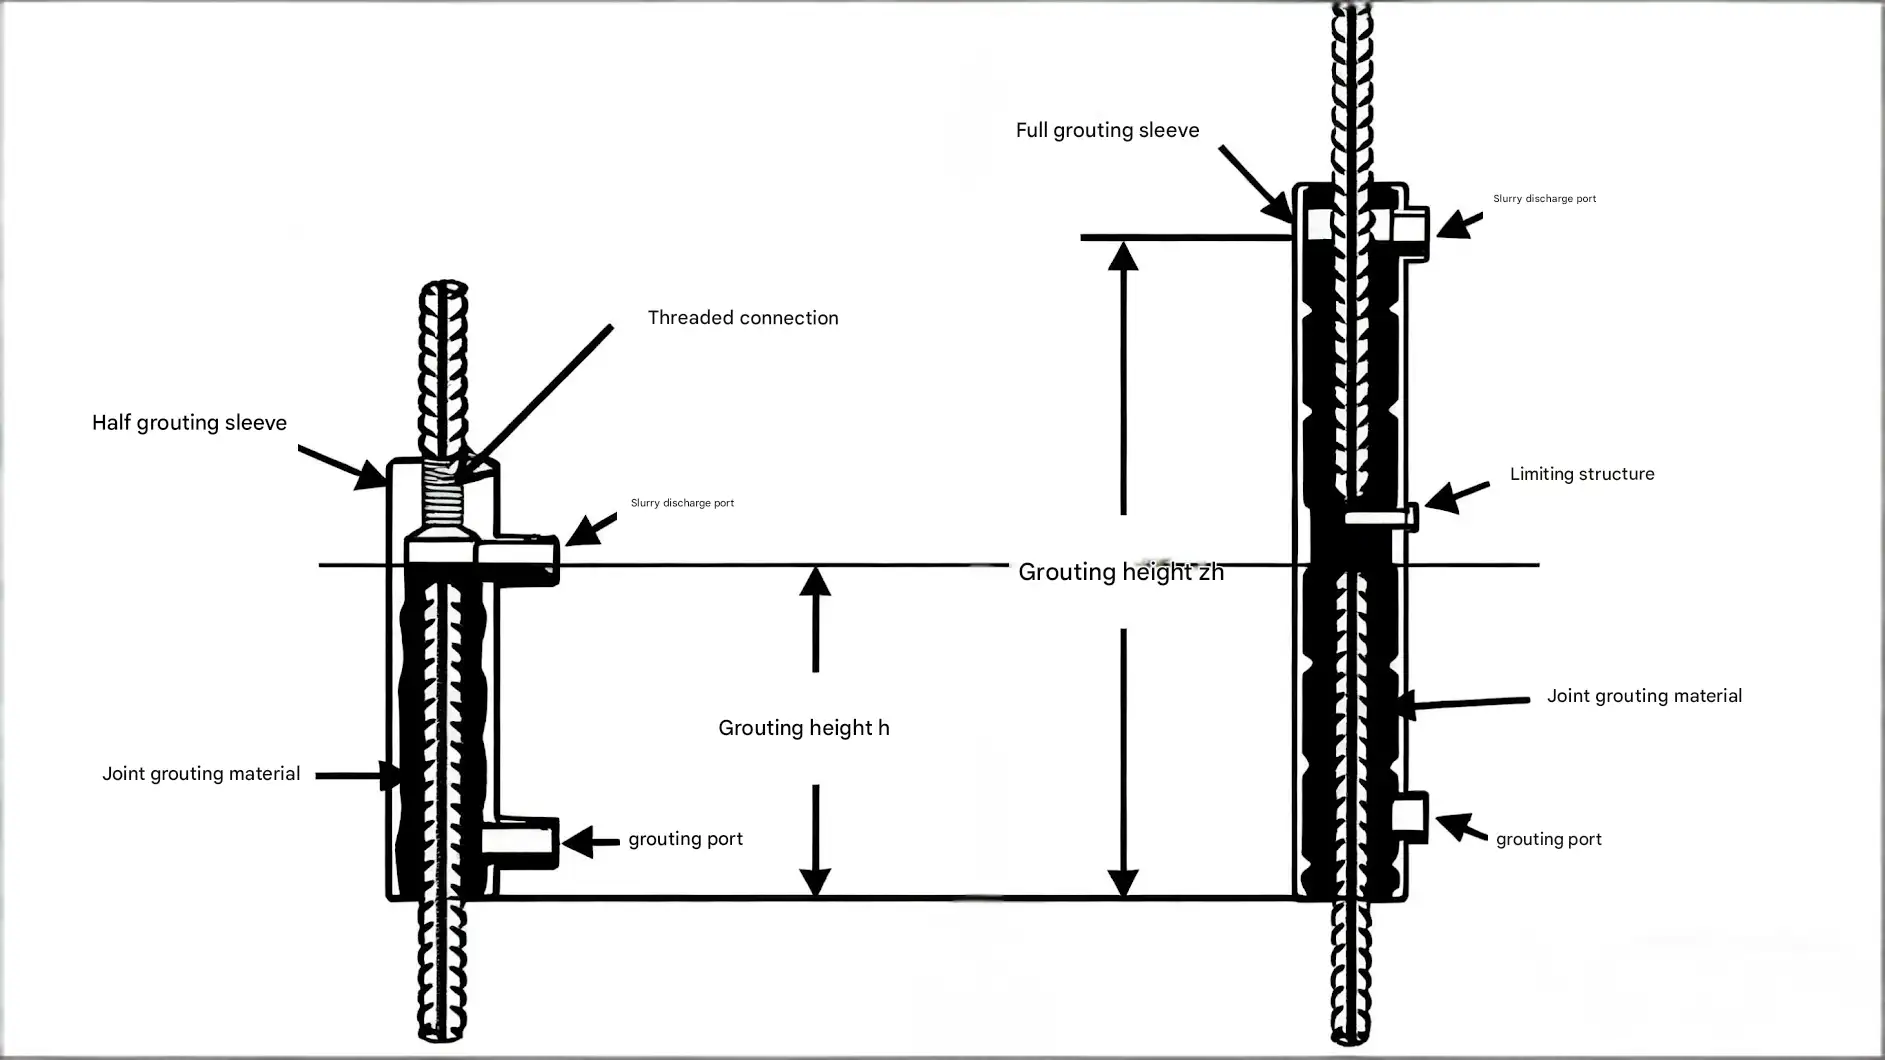
- Half grouted sleeve—one end with straight thread connection, one end with grout connection, used for vertical connections.
- Fully grouted sleeve—both ends with grout connections. Used for horizontal member connections, and can also be used for vertical member connections, but with differing structural details.
Half grouted sleeve:
advantage:
- Short sleeves require less material and fewer densely spaced stirrups;
- Factory-fixed sleeves enable quick and easy installation;
- On-site grout volume is halved, requiring less grouting material;
- Lower grouting pressure reduces sealing requirements, significantly easing construction difficulty;
- Incomplete grouting manifests at rebar ends, minimally affecting anchorage;
- On-site quality control becomes substantially easier, with greatly reduced quality risks.
disadvantage:
At the component factory, steel bar threads require processing through multiple steps.
Fully grouted sleeve
advantage:
No need to process rebar threads at the component factory, eliminating one step in the process.
disadvantage:
- Long sleeves require more material and denser stirrups.
- Factory sleeve fixation is challenging; limiters are recommended.
- Large on-site grouting volume consumes significant grout material.
- Increased grouting pressure demands stricter joint sealing, prone to leakage, and poses significant construction challenges.
- Incomplete grouting directly affects fully embedded reinforcement sections, severely impacting anchorage performance.
- Entire quality control relies on on-site execution, presenting high difficulty and risk.
Grouting material
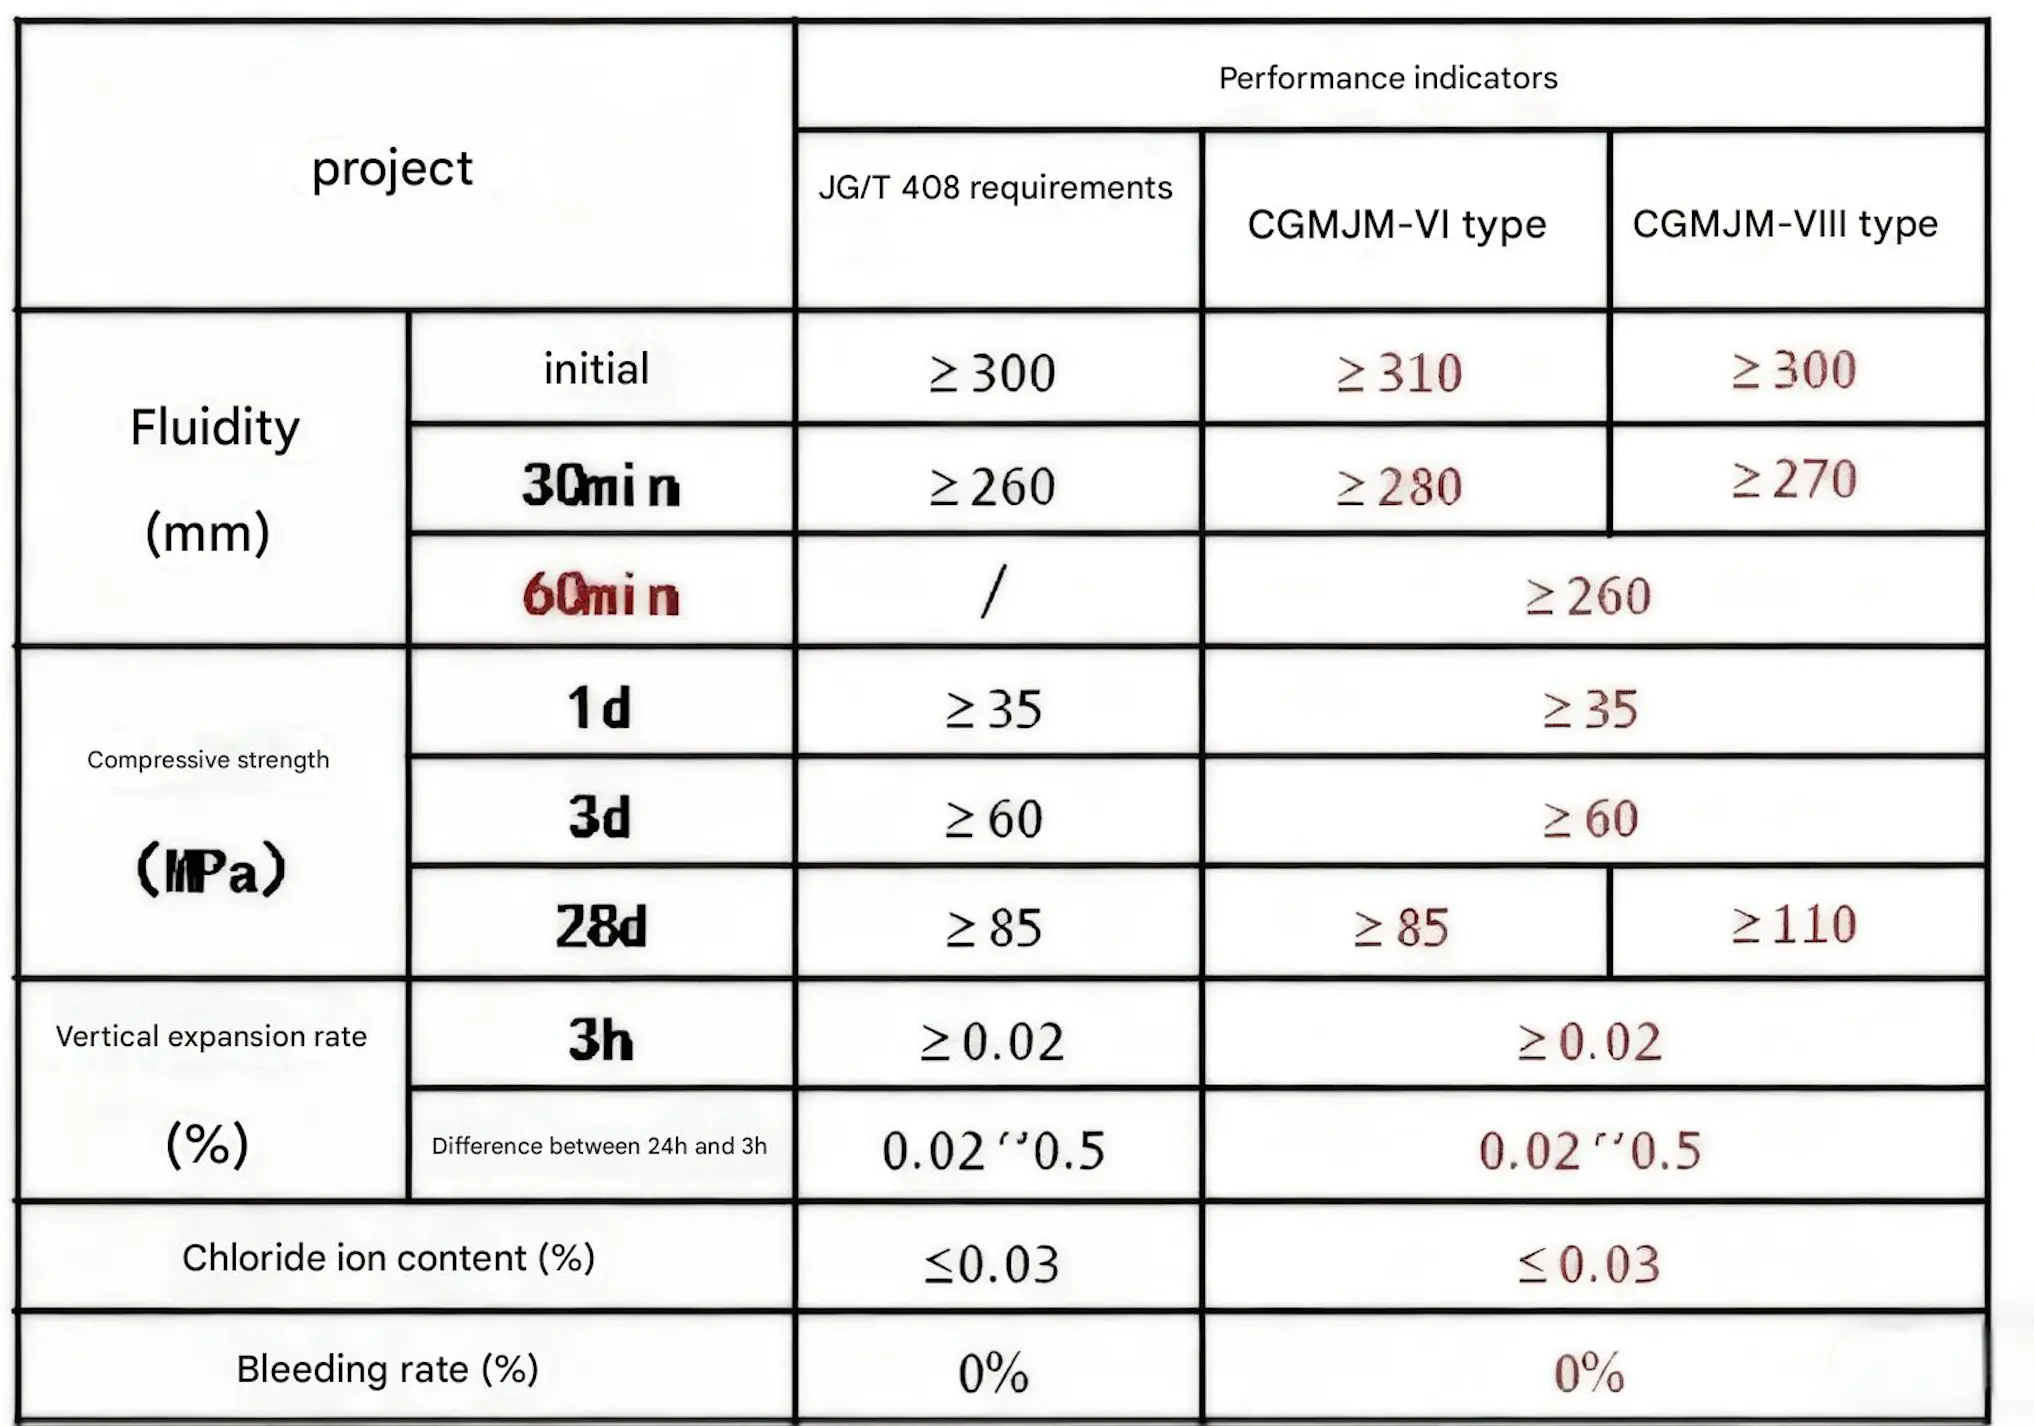
- VJG/T 408 Requirements: Grouting materials are cement-based and specify requirements for initial flow, 30-minute flow, compressive strength at 1 day/3 days/28 days, vertical expansion rate, chloride ion content, bleeding rate, etc.
- This standard primarily establishes key time points and final target values. However, grout performance can exhibit complex variations during application depending on operational methods (manual or mechanical grouting) and working conditions (ambient temperature fluctuations). Particular attention should be paid to workability and stability—process characteristics not addressed in the original standard—when selecting materials.

Note:
- Grouting verification for physical test specimens: JGJ 3556-1.4 stipulates that for initial construction, representative units or sections should be selected for trial fabrication, installation, and grouting.
- This process verification encompasses not only the grout material itself but also the associated construction equipment and techniques.


Auxiliary products
1、At the prefabrication plant (matching)
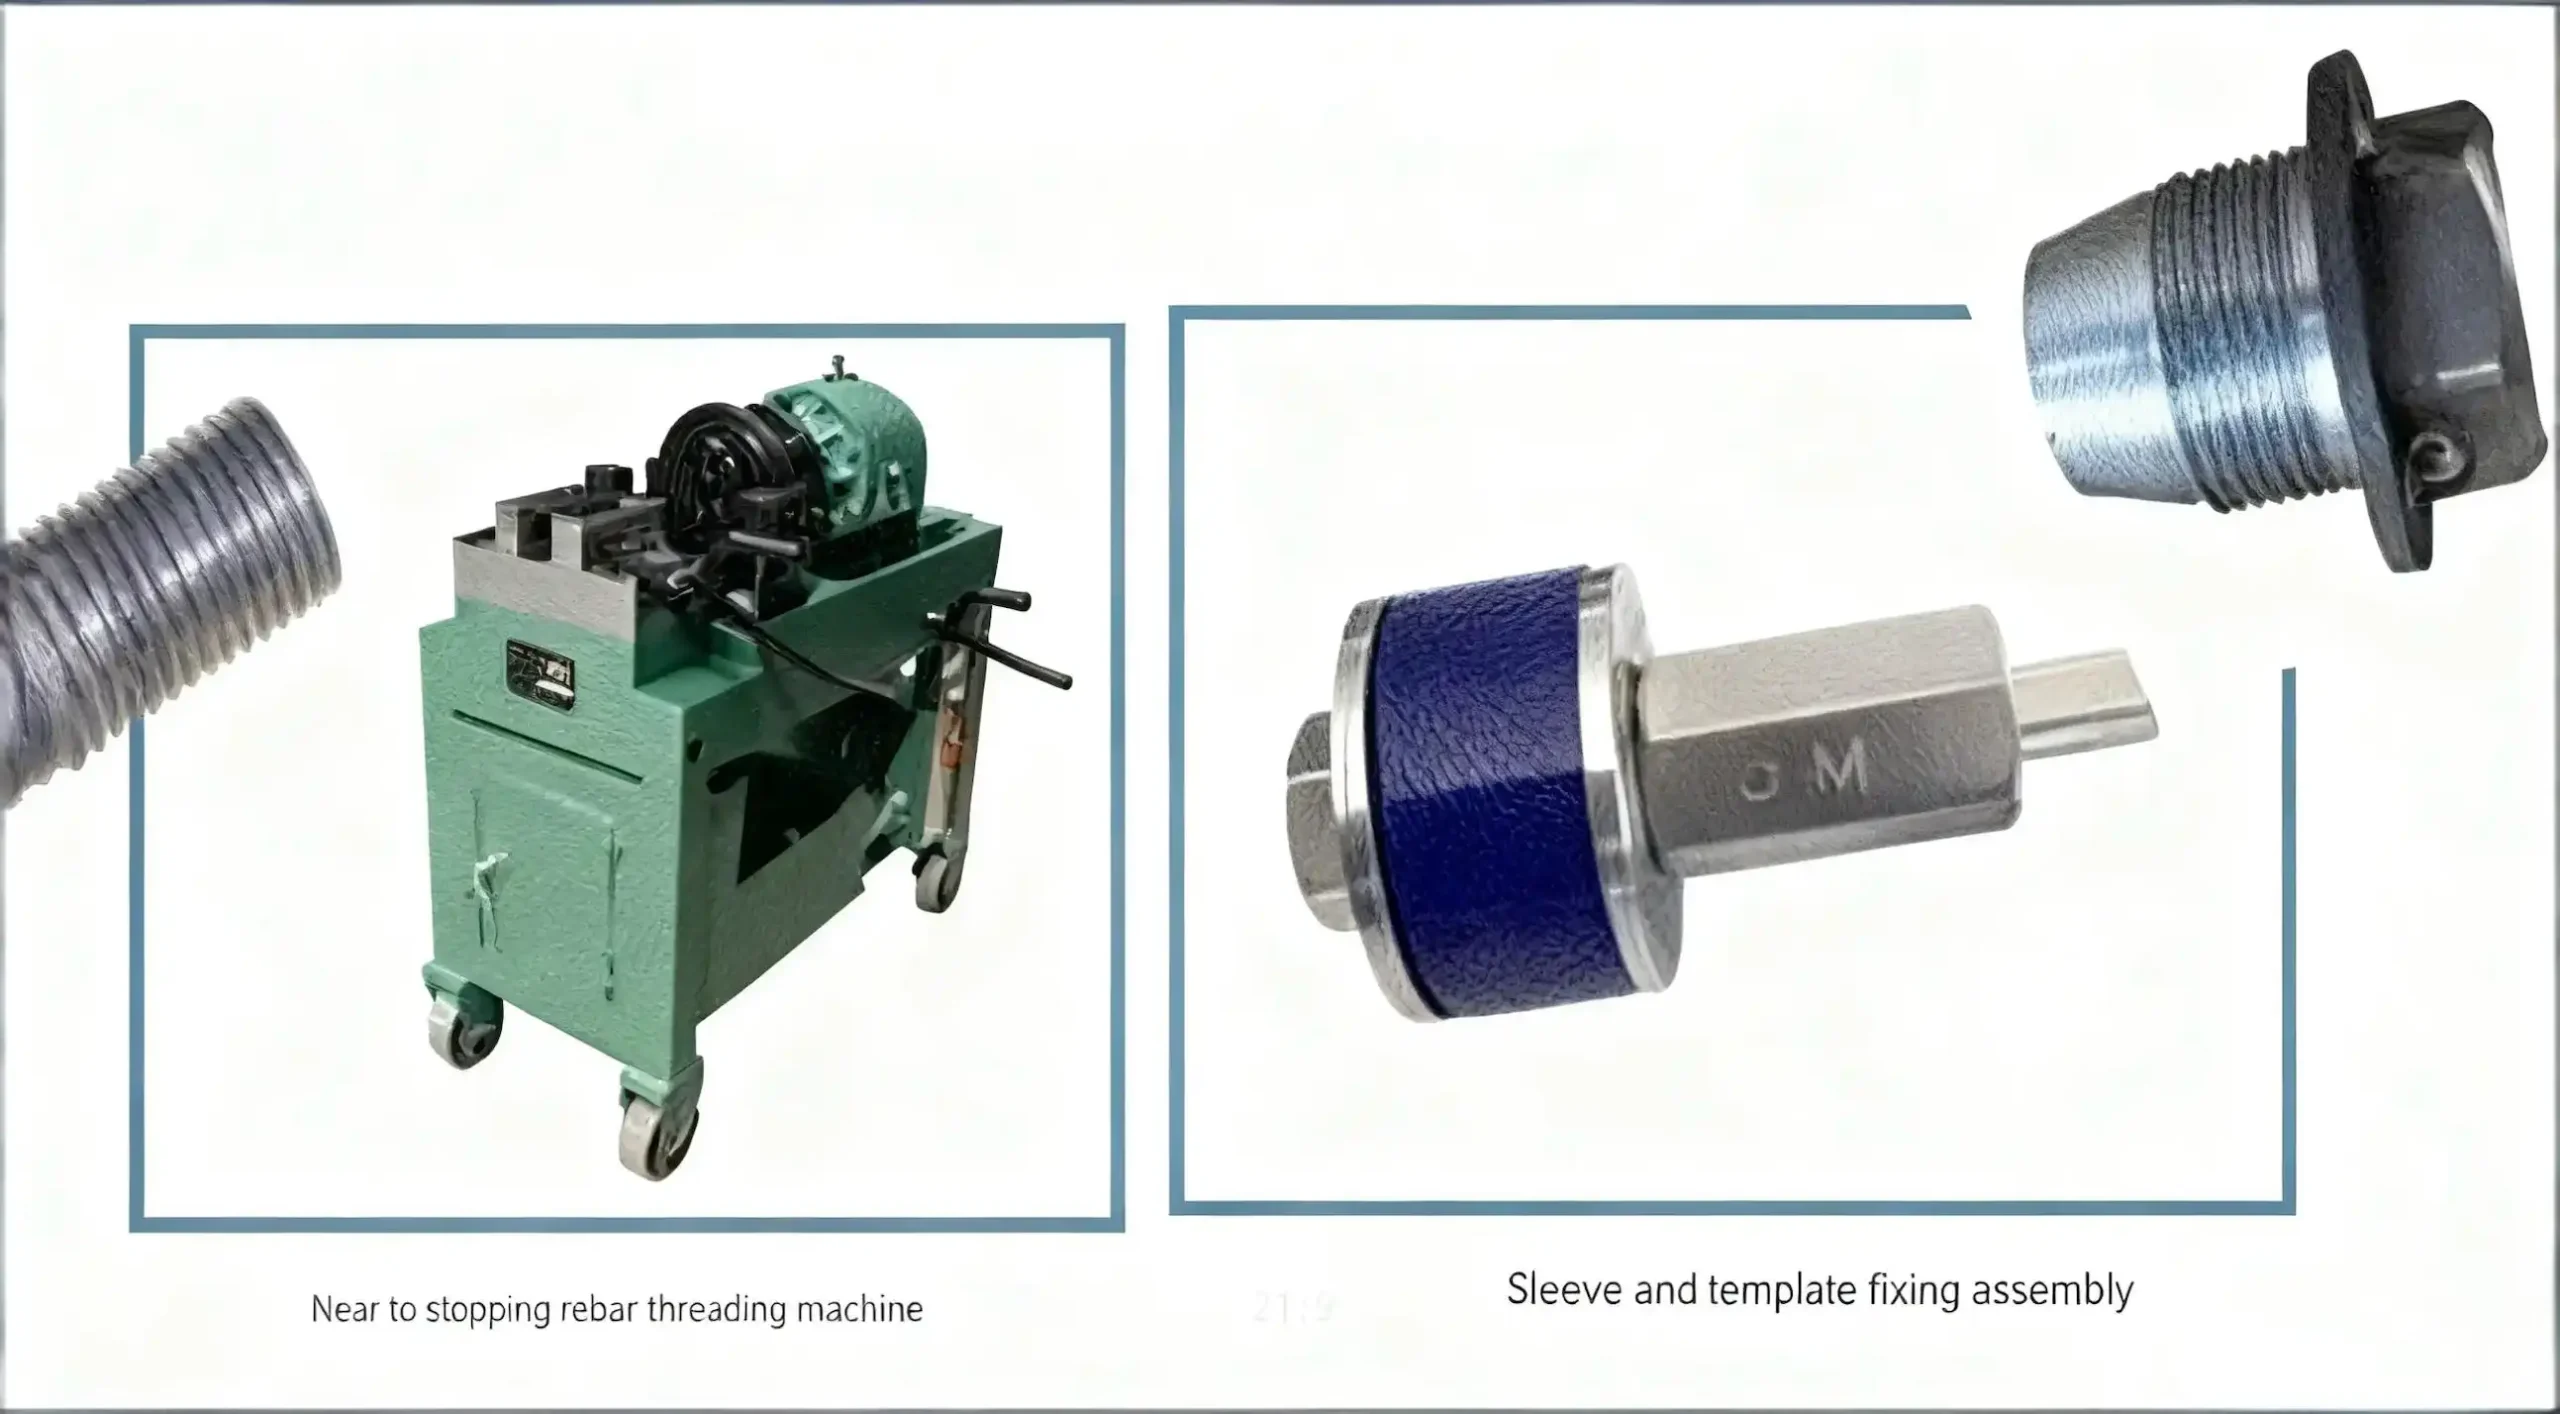
- For Half grouted sleeve connection: This involves machining straight threads onto rebar at the factory—the selected rebar threading machine must produce straight threads matching the sleeve design, otherwise compatibility issues may arise.
- Sleeve fixation to formwork: This primarily concerns efficiency, as well as grout leakage and positioning accuracy.

2、On-site (matching)
- Grouting Tools: For continuous grouting, use an electric grouting pump; for single grouting operations, a manual caulking gun may be used.
- Grouting Pump Principles and Precautions—involving grouting techniques, quality, speed, heat generation, air release…

2、Grouted Sleeve Connection Technology and Key Quality Control Points
2.1、Installation of Half Grouted Sleeves at Precast Component Factory
· Installation Process
- Roll threads on rebar ends
- Connect rebar threads to sleeves
- Secure sleeves to formwork
- Install grout discharge pipes
- Inspect grout passages after component formation
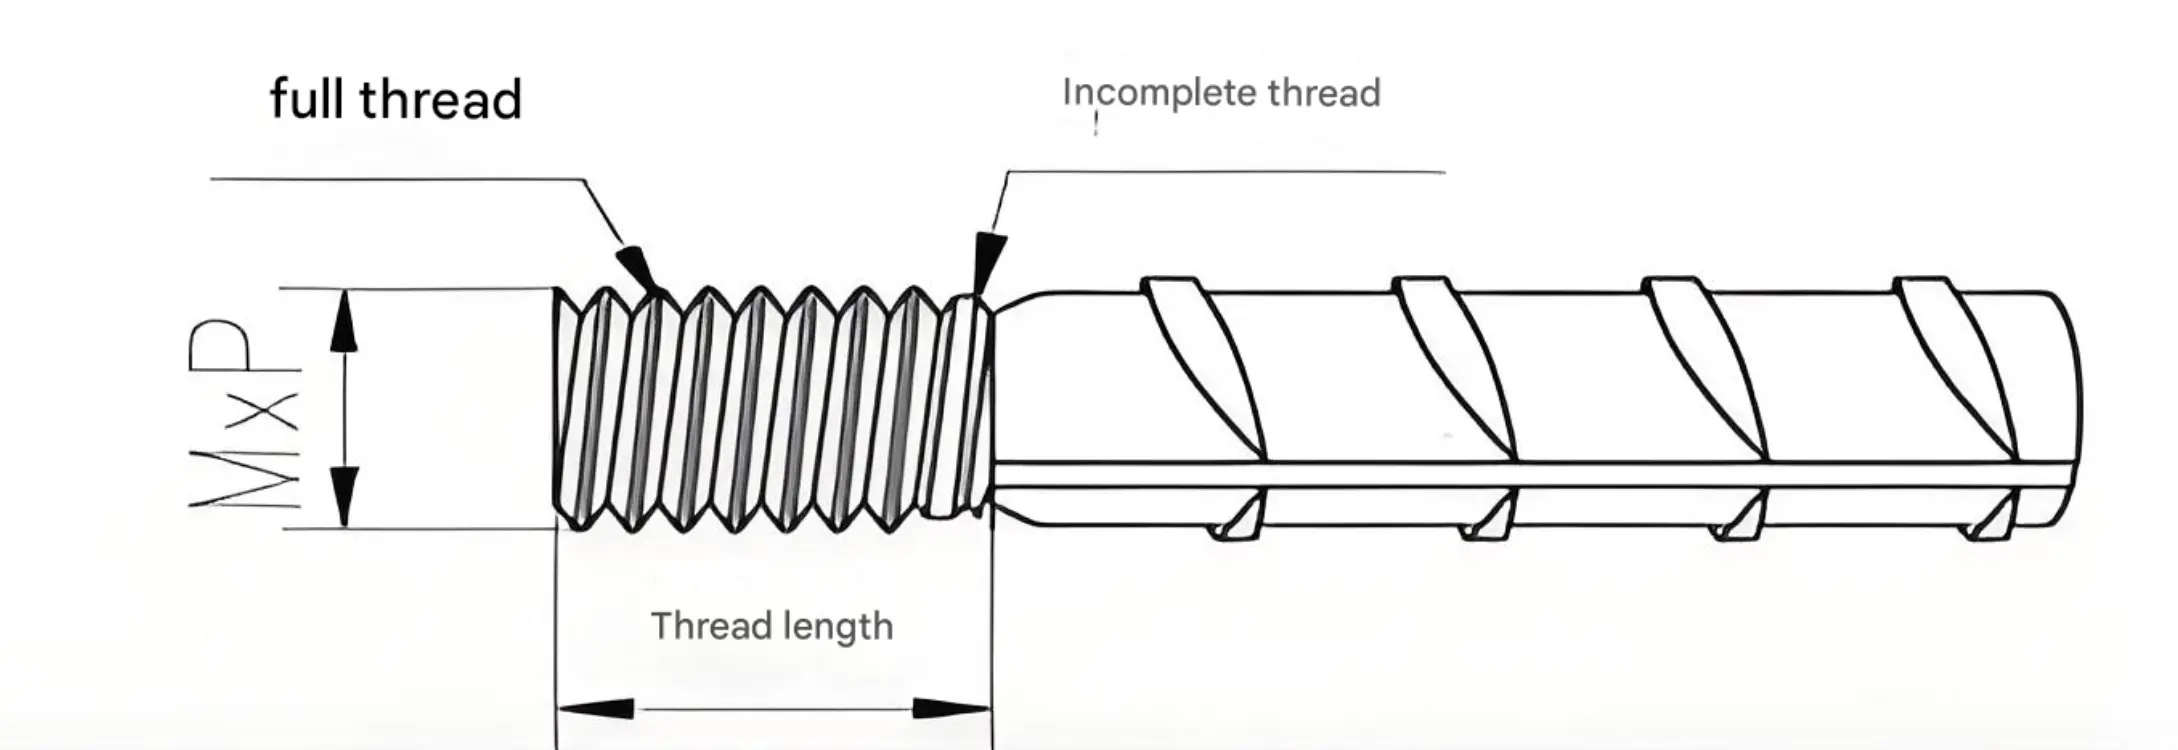
· Process 1:Reinforcing Bar Threading (Critical Process)
Reinforcing bar straight thread connections have become a very common method in on-site construction in China, and should be even easier to implement in component factories.
However, neglecting proper attention can easily lead to failure to meet tensile strength requirements!
Products involved: Grout-filled straight thread coupling sleeves, rebar threading machines.
Note: Personnel involved in rebar threading and sleeve installation must undergo professional training and hold valid certifications.
Key control points for this process:
- Reinforcing bar ends must be straight and level.
- Threading machines and processing parameters must be matched to the socket thread specifications.
- Thread quality parameters must be inspected and approved as required.

· Process 2:Reinforcing Bars to Grouted Sleeve Connection
- Tighten the connection between the qualified rebar threaded end and the grouting sleeve using a wrench. Verify that both the exposed thread length and tightening torque meet specifications.
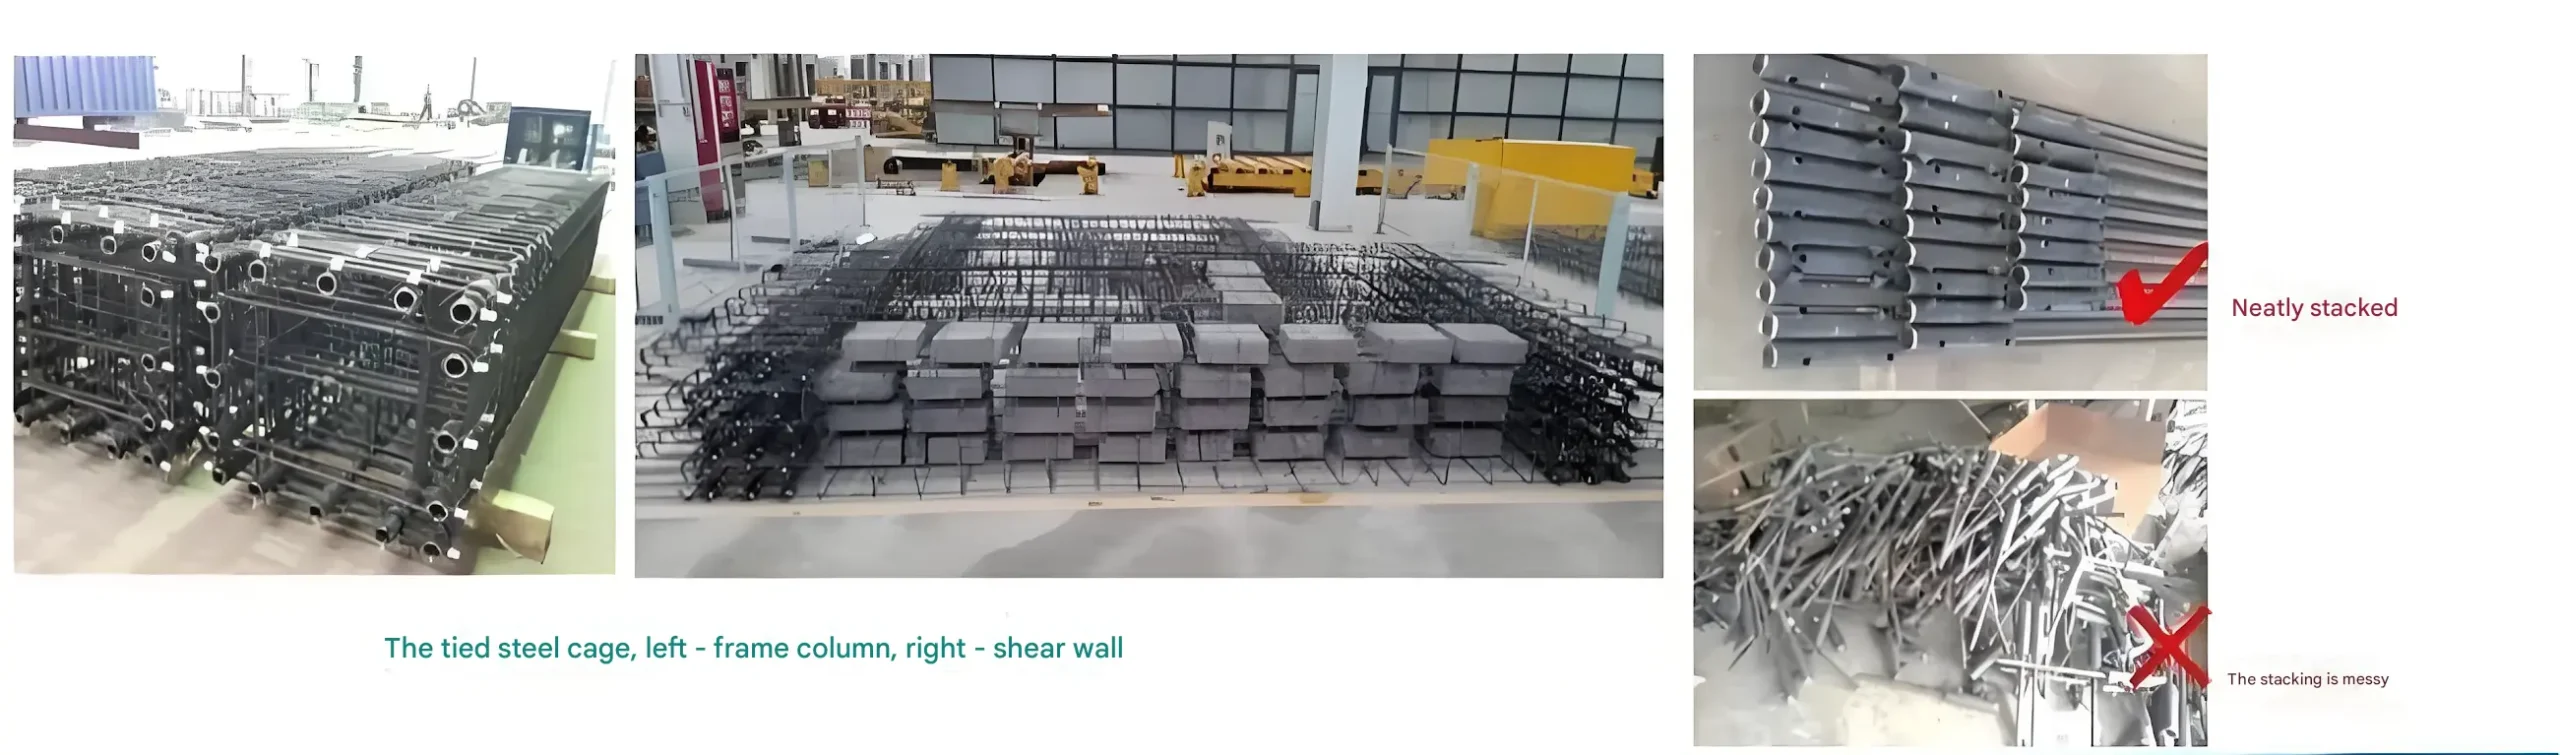
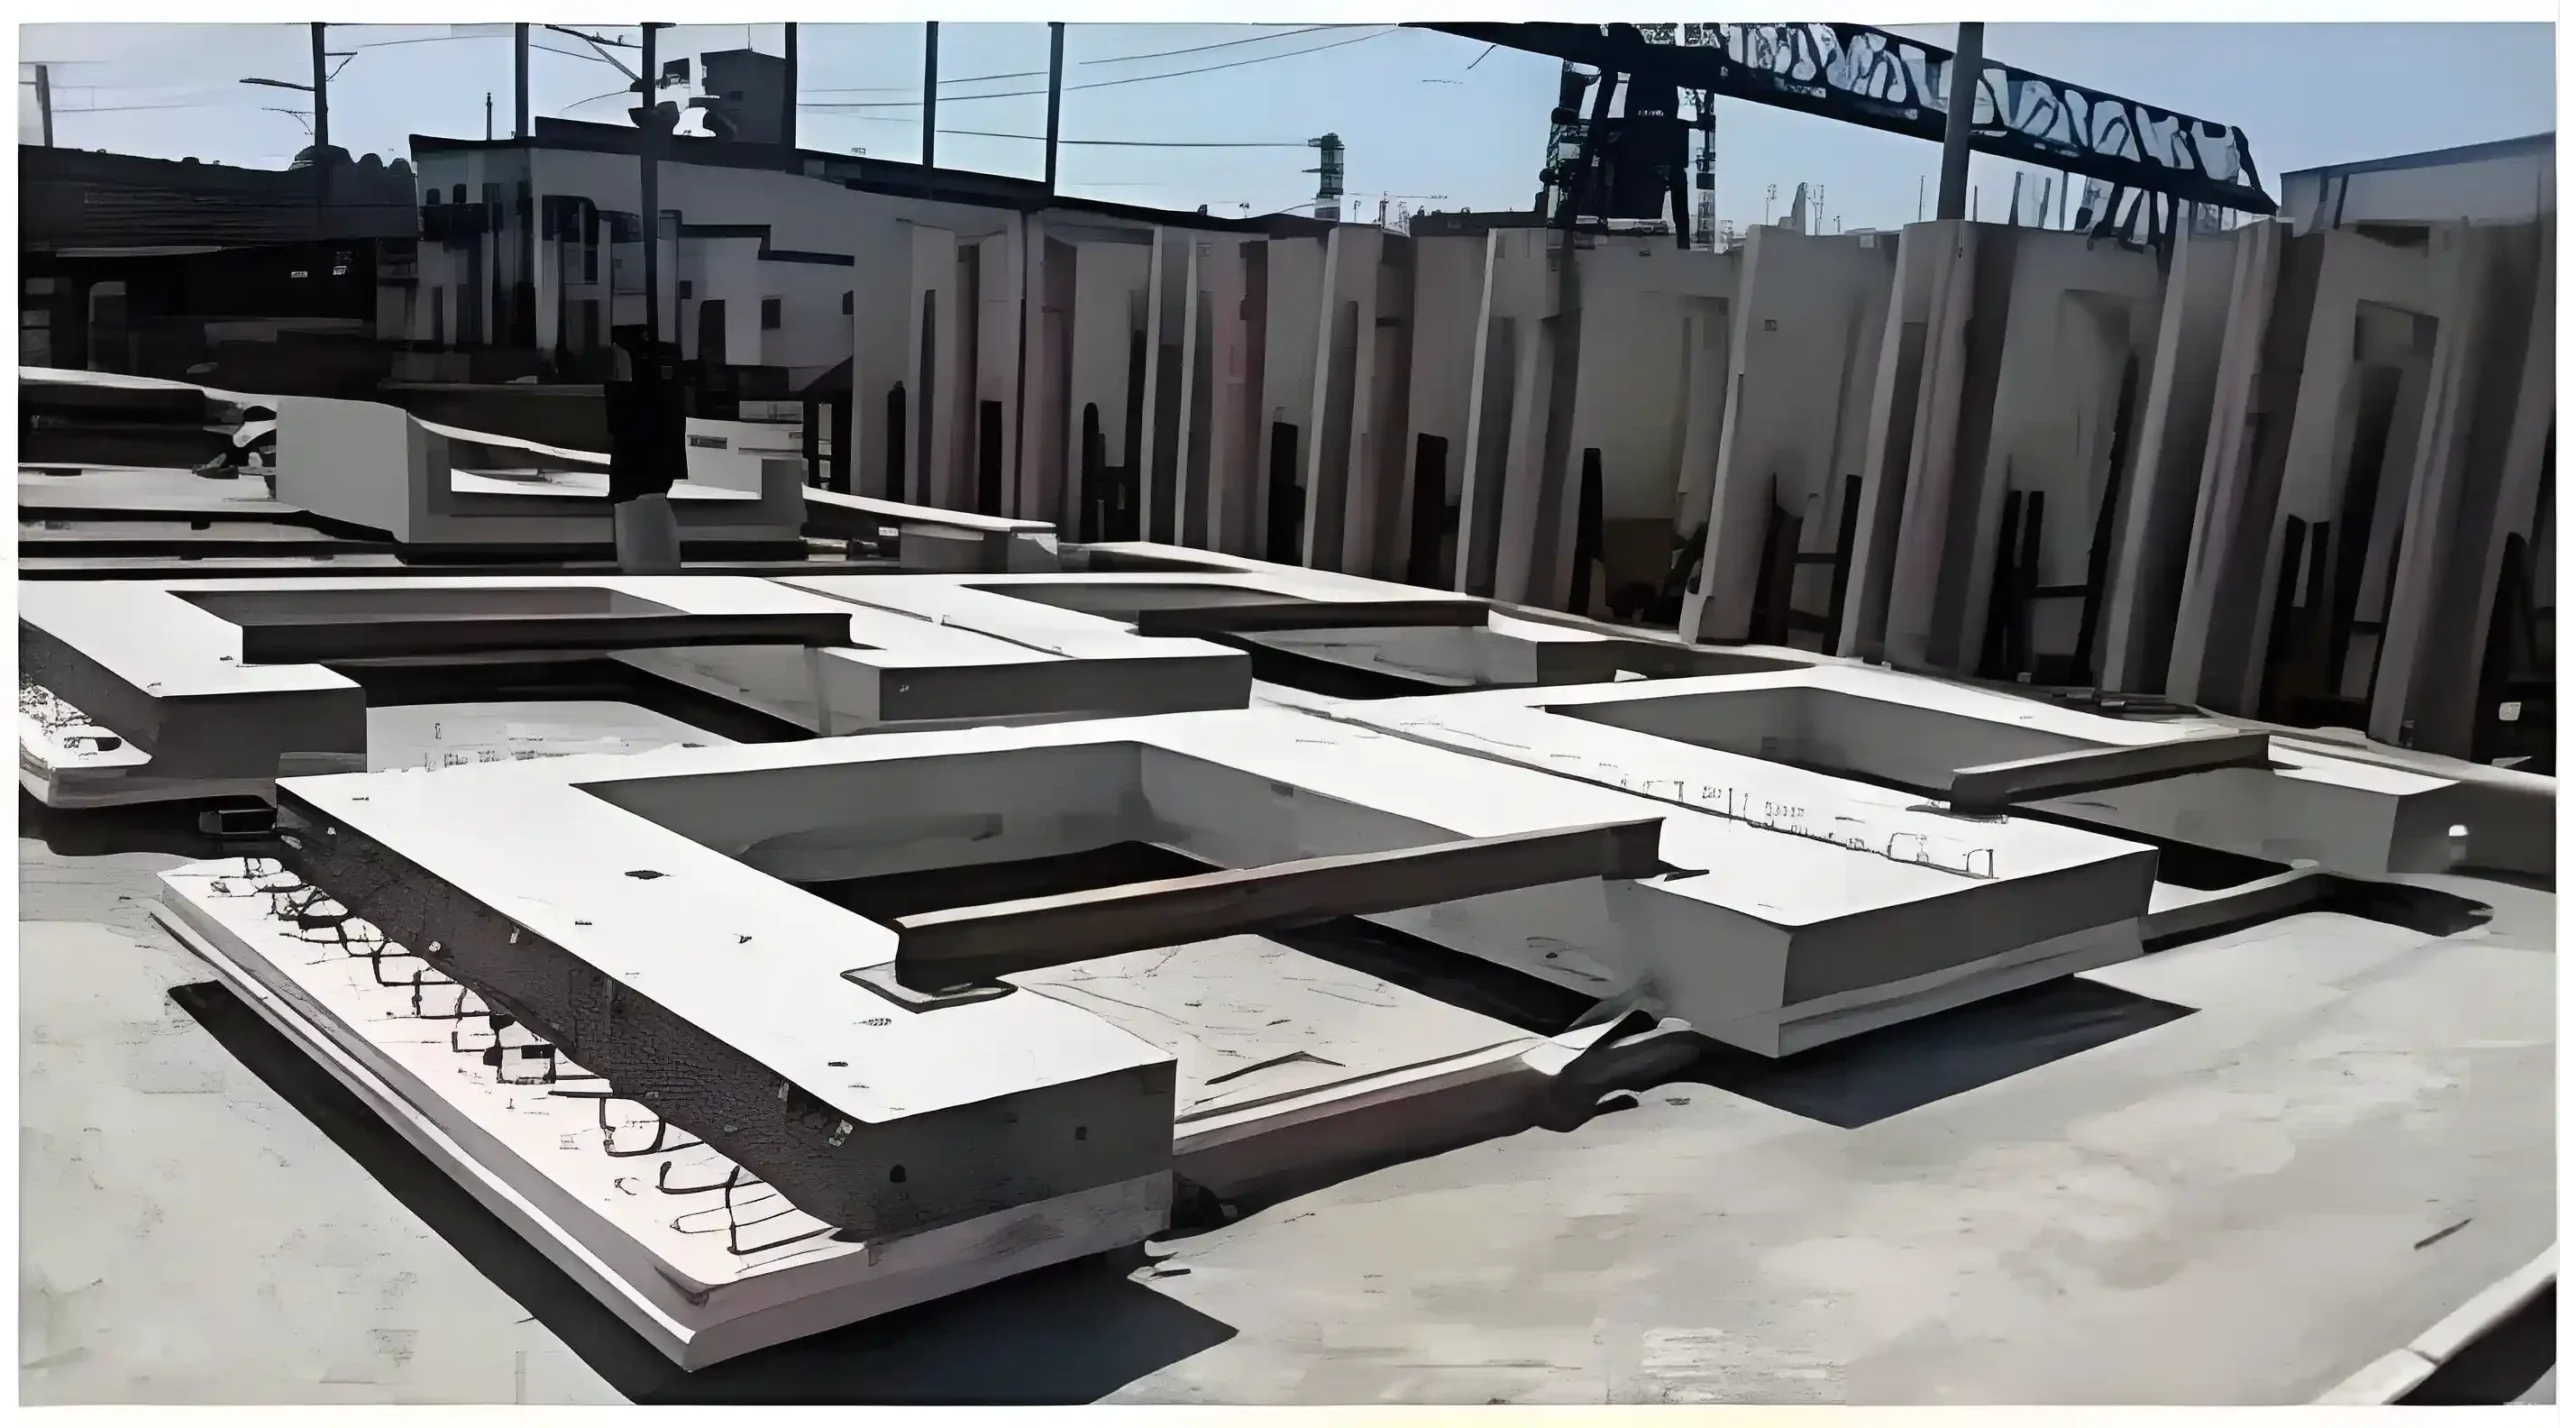
- Stack the installed rebars with sleeves neatly.

· Process 3:Grout Sleeve and Formwork Fixing
Position the sleeve end flush against the precast formwork and secure it using the sleeve-specific fasteners. (Full-grout sleeves are more difficult to secure than half-grout sleeves.)
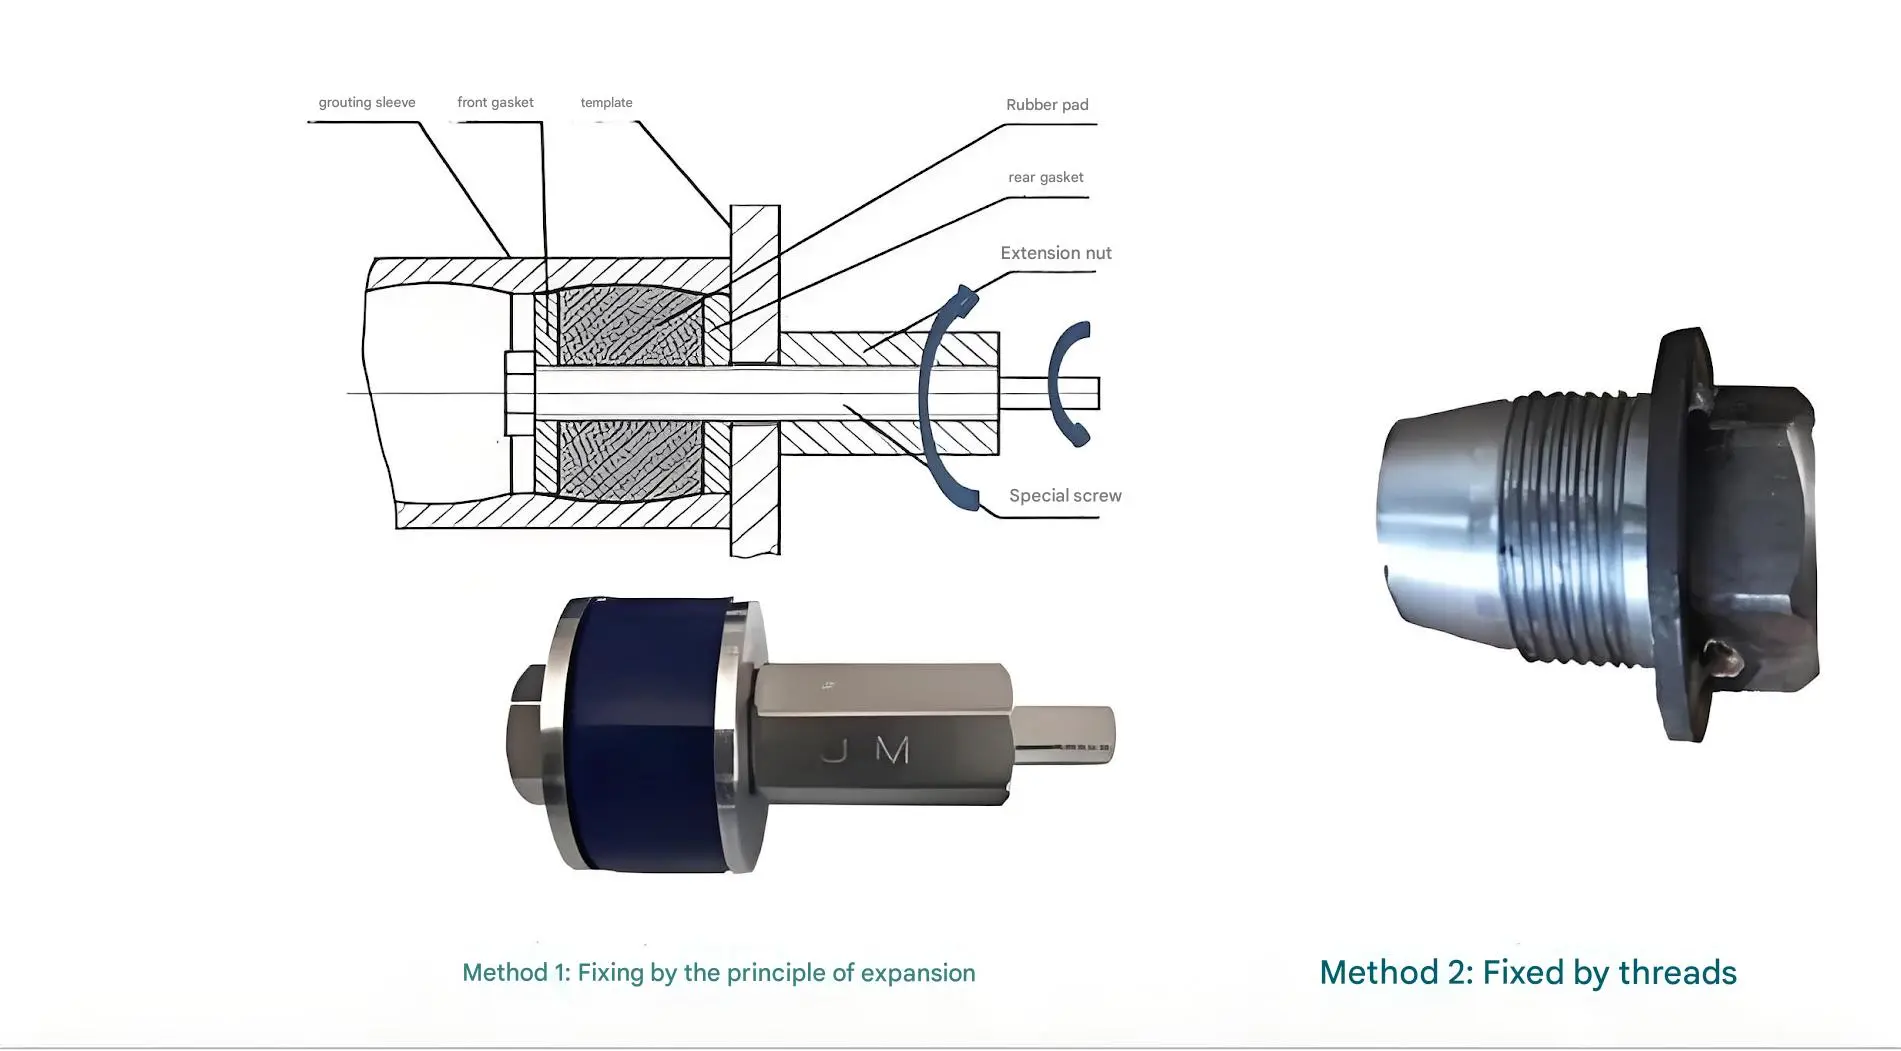
Japan also frequently employs the expansion principle to secure grouting sleeves. China utilizes various fixing methods, but must ensure: 1. Accurate positioning of the sleeve; 2. No leakage of grout.
· Process 4:Install grout discharge pipes
There are three types of slurry discharge pipes commonly encountered: PVC, rubber corrugated pipes, and steel wire-reinforced flexible hoses.

Note: Grout discharge pipes must be securely installed and, if necessary, tied down to prevent detachment or leakage during concrete pouring.
· Process 5:Inspect the grouting ducts after component forming
After component fabrication and prior to shipment:
- Verify that the grout sleeve positioning and anchor bar length meet specifications;
- Inspect the sleeve cavity, grout lines, and drainage pipes to ensure unobstructed flow with no blockages or foreign objects.


Note: In actual applications, instances have occurred where grouting pipes were found blocked during on-site installation, resulting in costly rework requiring the entire component to be returned. Strengthen factory inspections.
2.2、Grout injection for wall and column sleeves at the construction site
On-site Installation Technical Process
- Inspection of connection points
- Lifting and securing of components
- Sealing horizontal joints and compartmentalization
- Preparation of grout material
- Grout injection
- Post-grouting node protection
Key processes throughout the entire procedure: 3. Sealing the joints 4. Preparing the grout mixture 5. Grouting;
Products involved: Grouting materials, joint sealing compounds (bedding mortar), electric grouting pumps, etc.
Note: Grouting personnel must undergo professional training and hold valid certification before commencing work.
· Process 1:Inspection and Preparation of Connection Points Before Component Hoisting
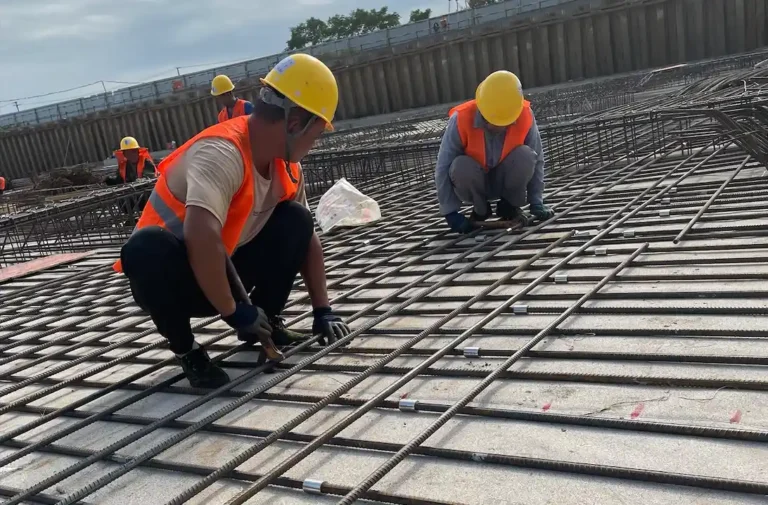
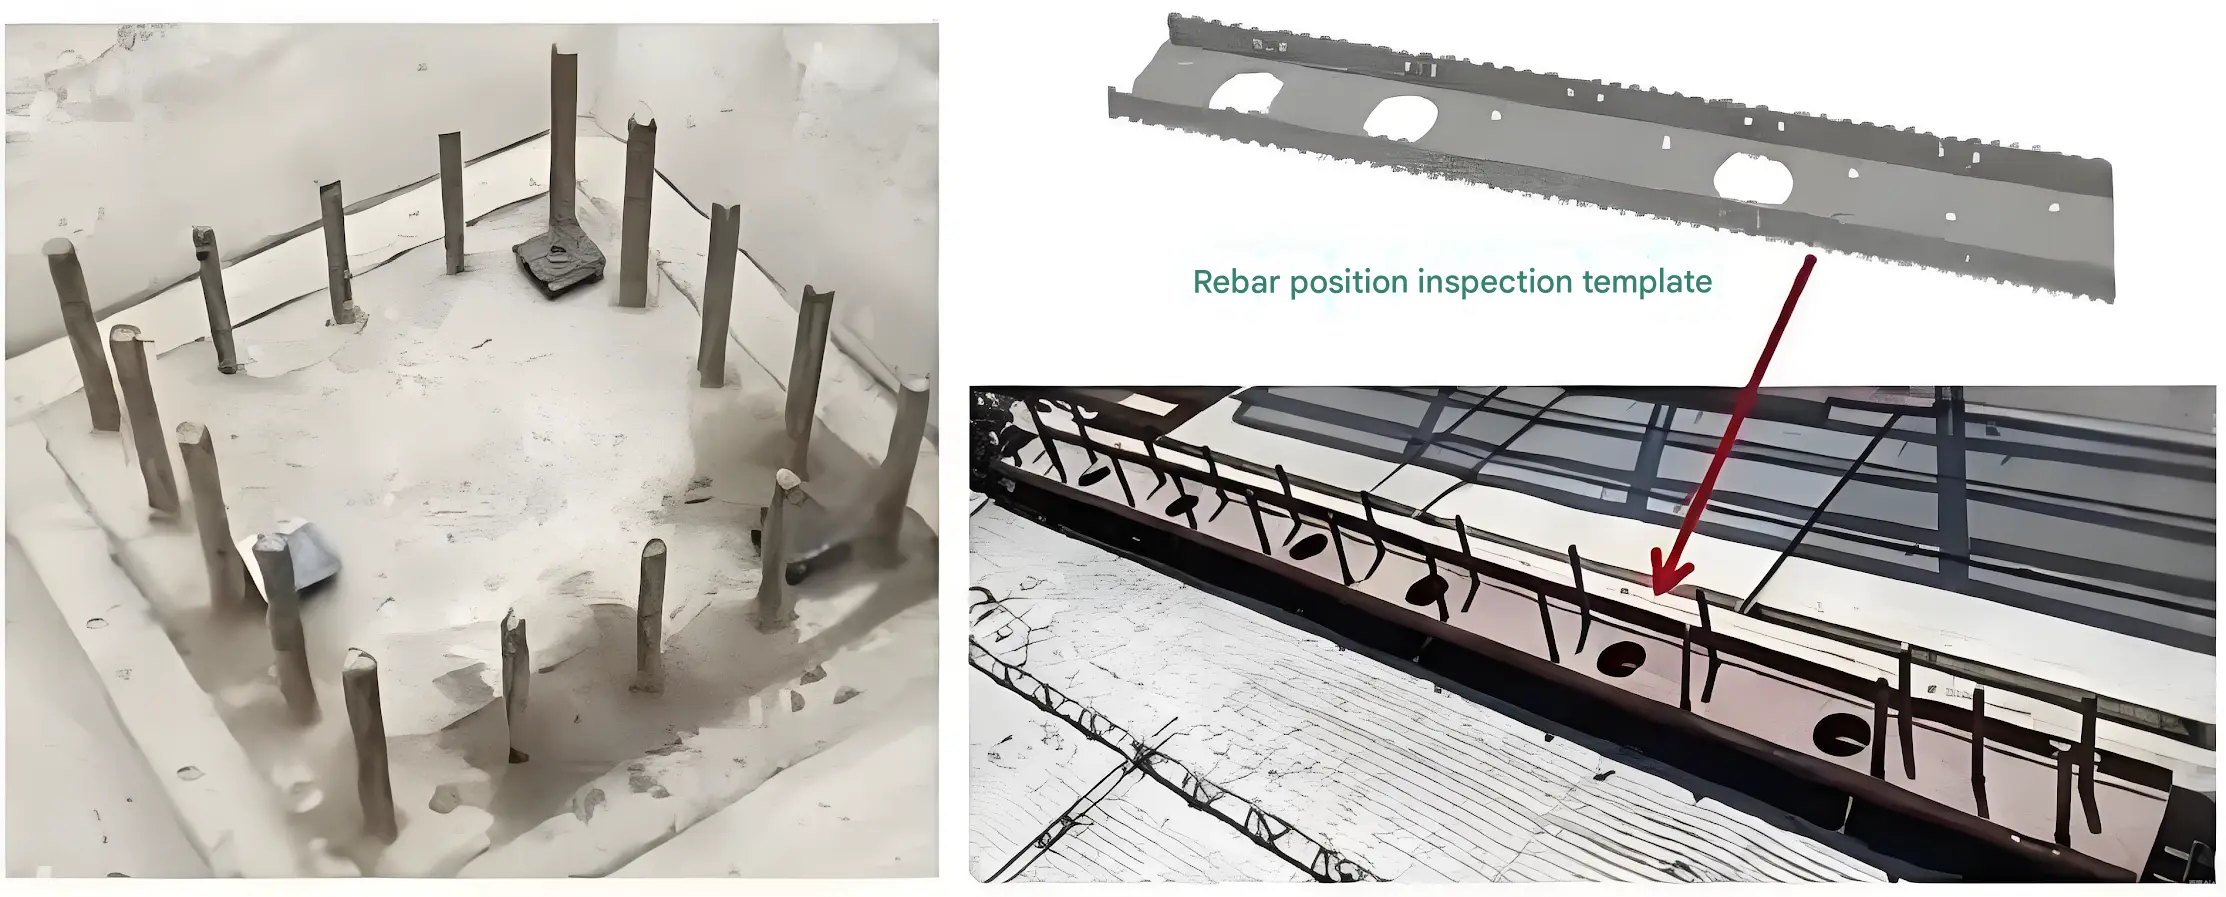
1、 Reinforcement Connection Inspection:
- Check the length of reinforcement bars to be connected using a straightedge.
- Verify reinforcement positional deviation using formwork.
- Reinforcement surfaces must be clean, free of severe rust and adherent substances.
2、Component Connection Surface Preparation
Reinforcement Position Verification Formwork
- The underside of the grout joint must be clean and free of contaminants.
- During hot, dry seasons, moisten the grouting surfaces of components, but avoid pooling water.
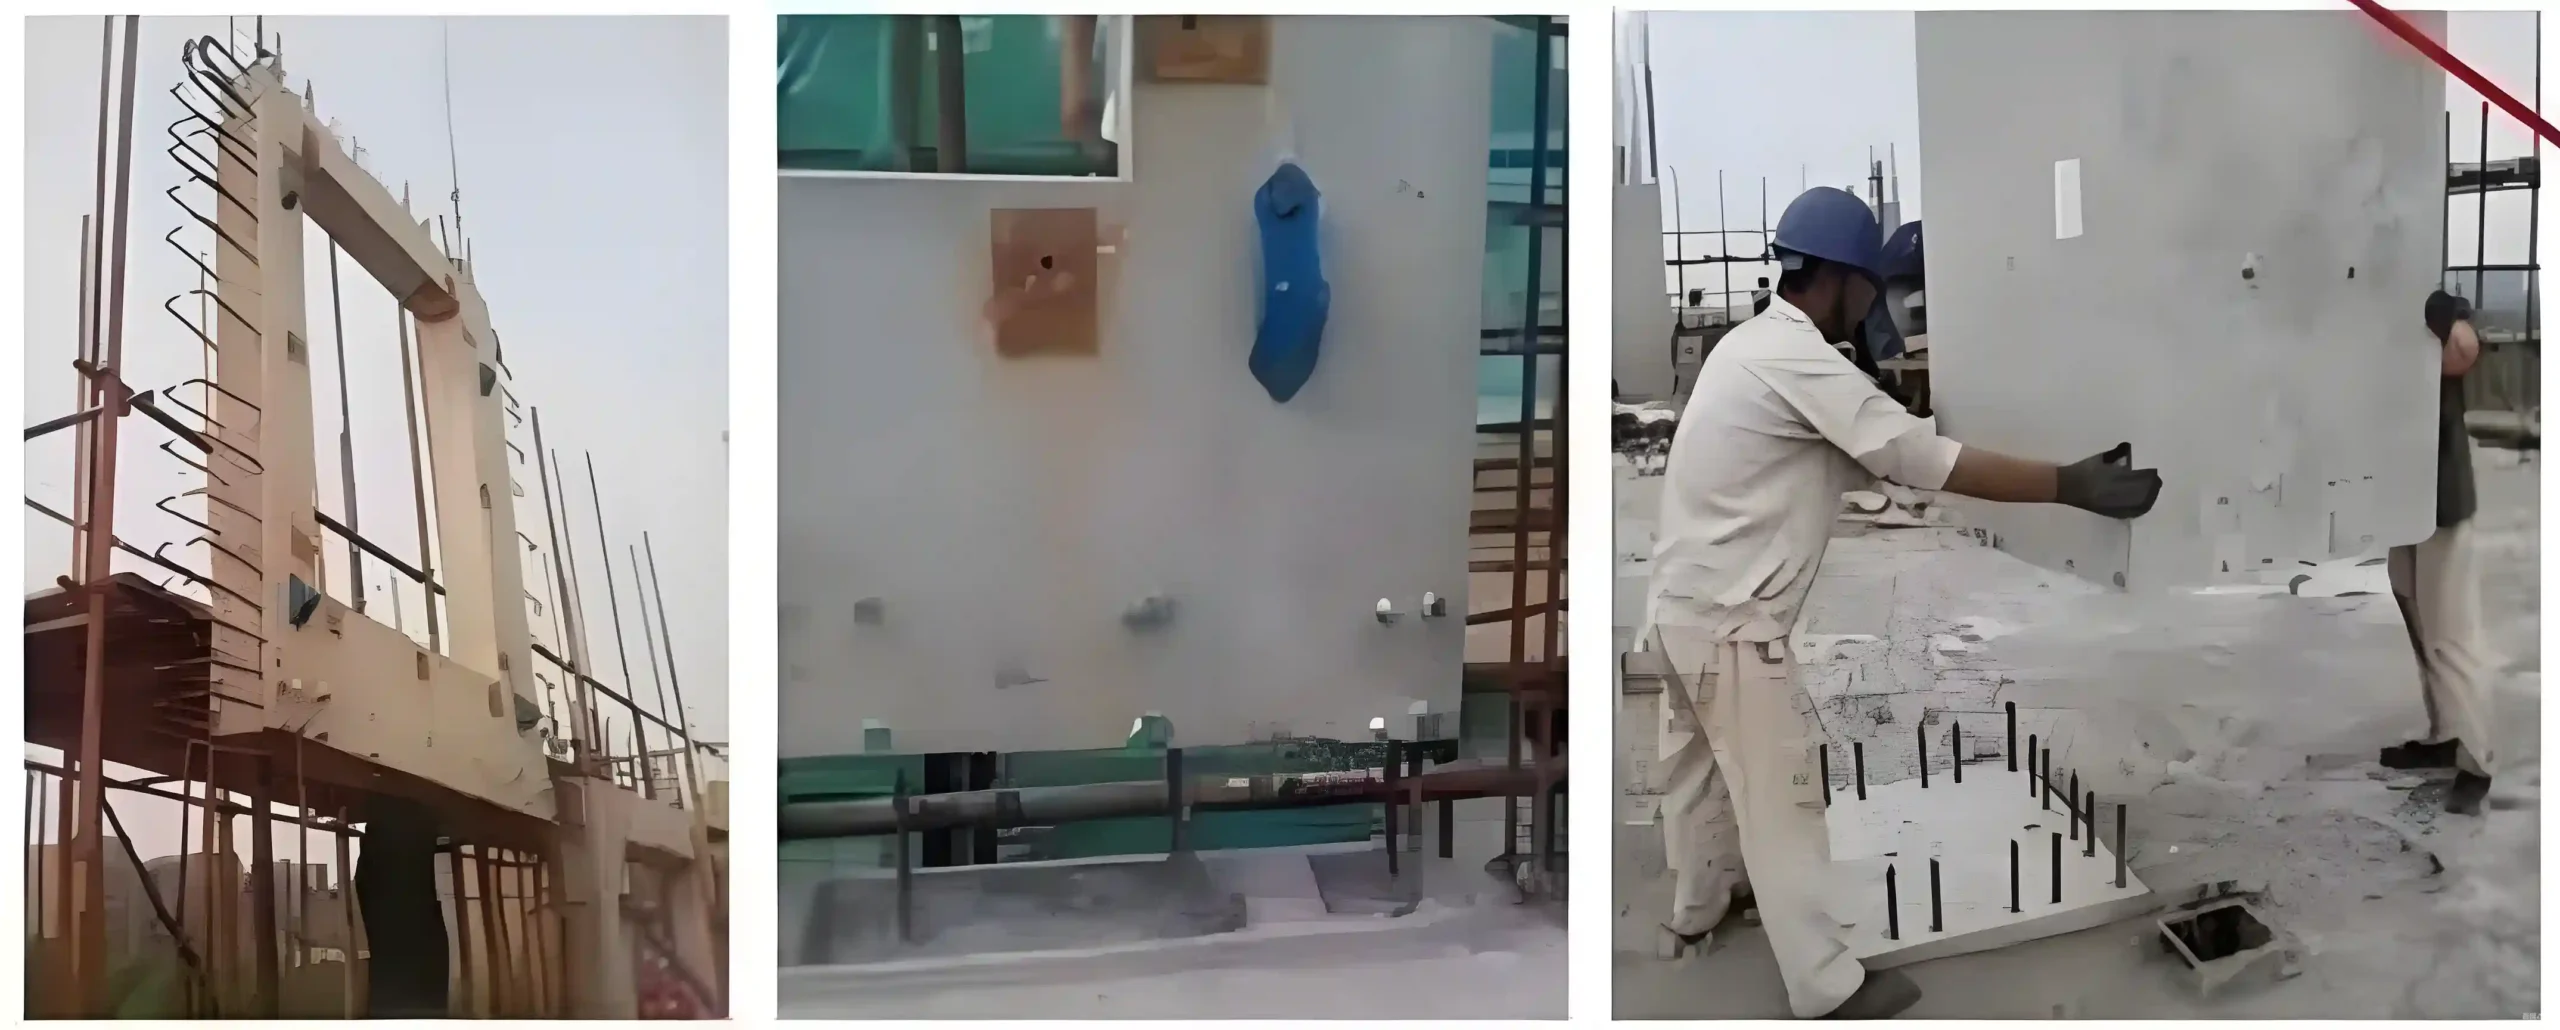
· Process 2:Lifting and securing components
- Place adjustable shims approximately 20mm thick on the installation base surface and level them.
- During installation, each protruding reinforcement bar from the lower component must be inserted into the connection sleeve of the upper precast component.
- Secure the components after verifying their position and verticality.
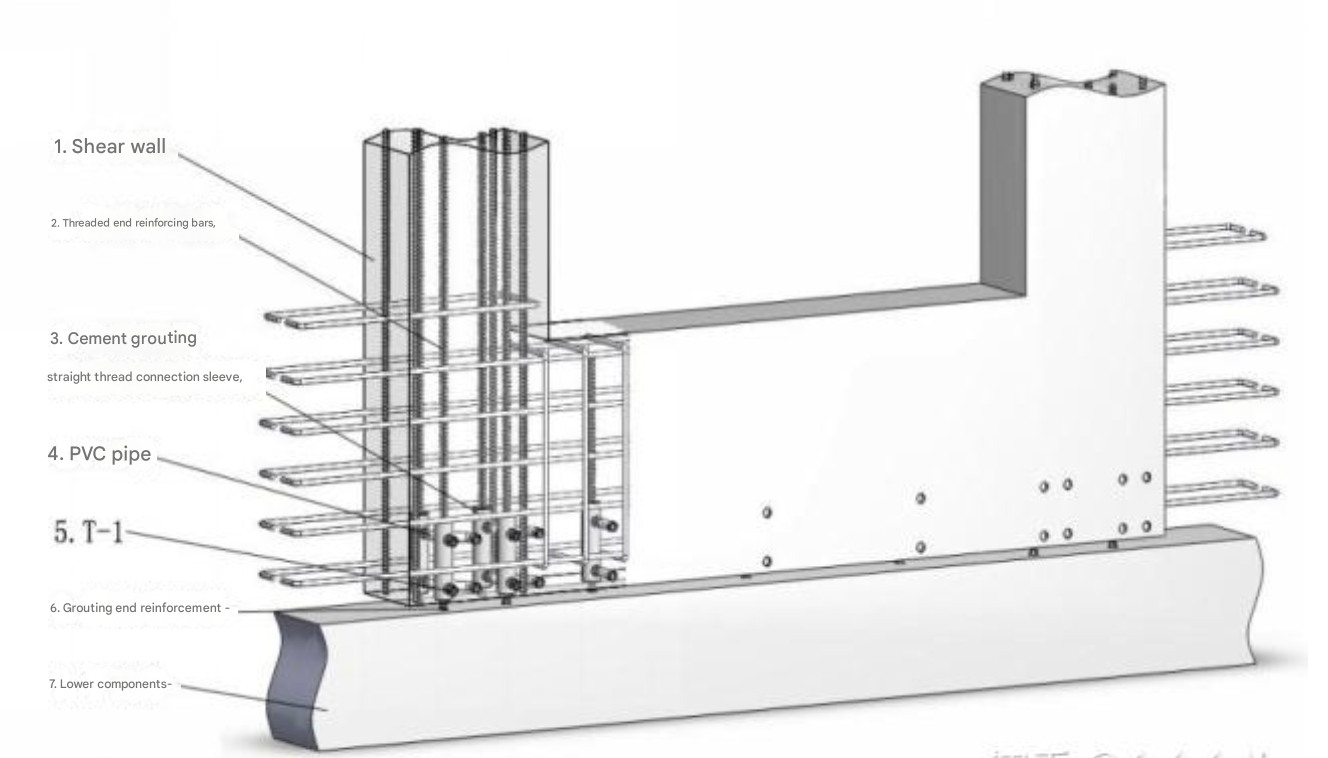
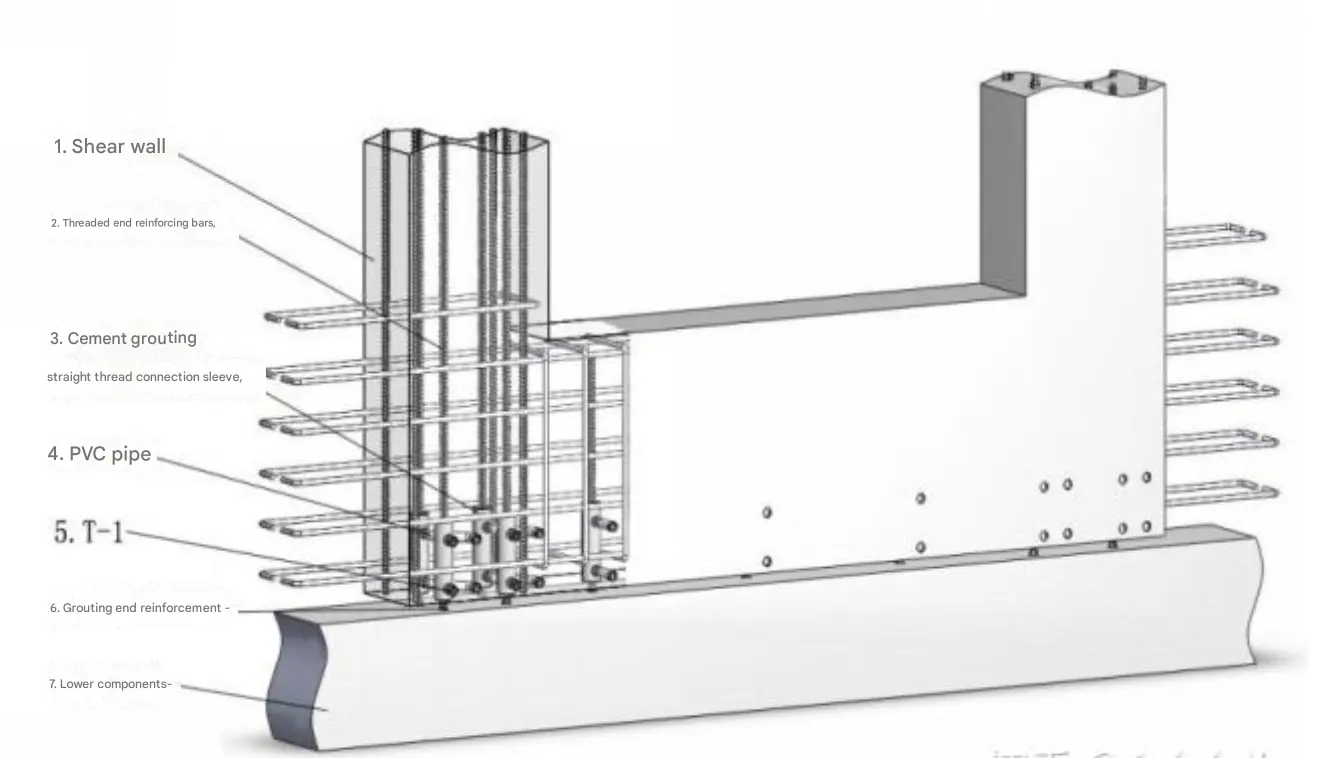
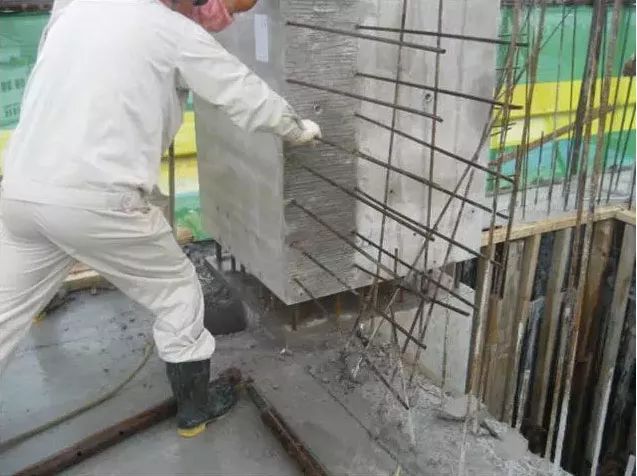
· Process 3:Sealing the joints during multi-sleeve interconnected grouting (a critical process; failure to execute properly may result in grout leakage)
1、Closing Horizontal Joints Between Building Components – Joint Sealing Grout
- Line the inner side with reinforcement (hose or steel plate), then apply a 1.5–2 cm thick layer of mortar externally (ensuring no blockage of the sleeve holes);
- After application, verify that the dry strength reaches the required level of approximately 30 MPa before grouting.
2、Seal the outer joints of sandwich wall panels using sealing tape (rubber-plastic cotton strips)
- The exterior of shear walls features EPS insulation boards, making sealing challenging. Sealing tape is typically used for this purpose.
- The sealing tape must be sufficiently thick to maintain adequate strength after being compressed to the joint height.
- The sealing tape must be non-absorbent to prevent moisture absorption from grout, which could cause shrinkage.
3、Before component hoisting, the sealing tape is secured to the level surface of the bottom foundation. Joints exceeding 1.5 meters in length shall be divided into sections. Sectioning may be achieved using joint grouting or rubber-plastic cotton strips (subject to design approval).
- Process 3 – Grout Sealing for Multi-Sleeve Interconnected Grouting (Critical Process; Improper Execution May Cause Grout Leakage)
- When not employing interconnected cavity grouting (i.e., single-sleeve grouting) – JGJ355 specifies that a grout bedding layer must be installed. This process requires ensuring the grout bedding layer is fully compacted after component installation, preventing grout material from entering the sleeves.
- Singapore Method (Fewer Sleeves):1、Place a set of elastic sealing components at the reserved connection points for reinforcing bars;
2、Build a mortar dam around the component joint perimeter;
3、After hoisting the components into position, grout each sleeve individually first, then separately grout and fill the horizontal joints.
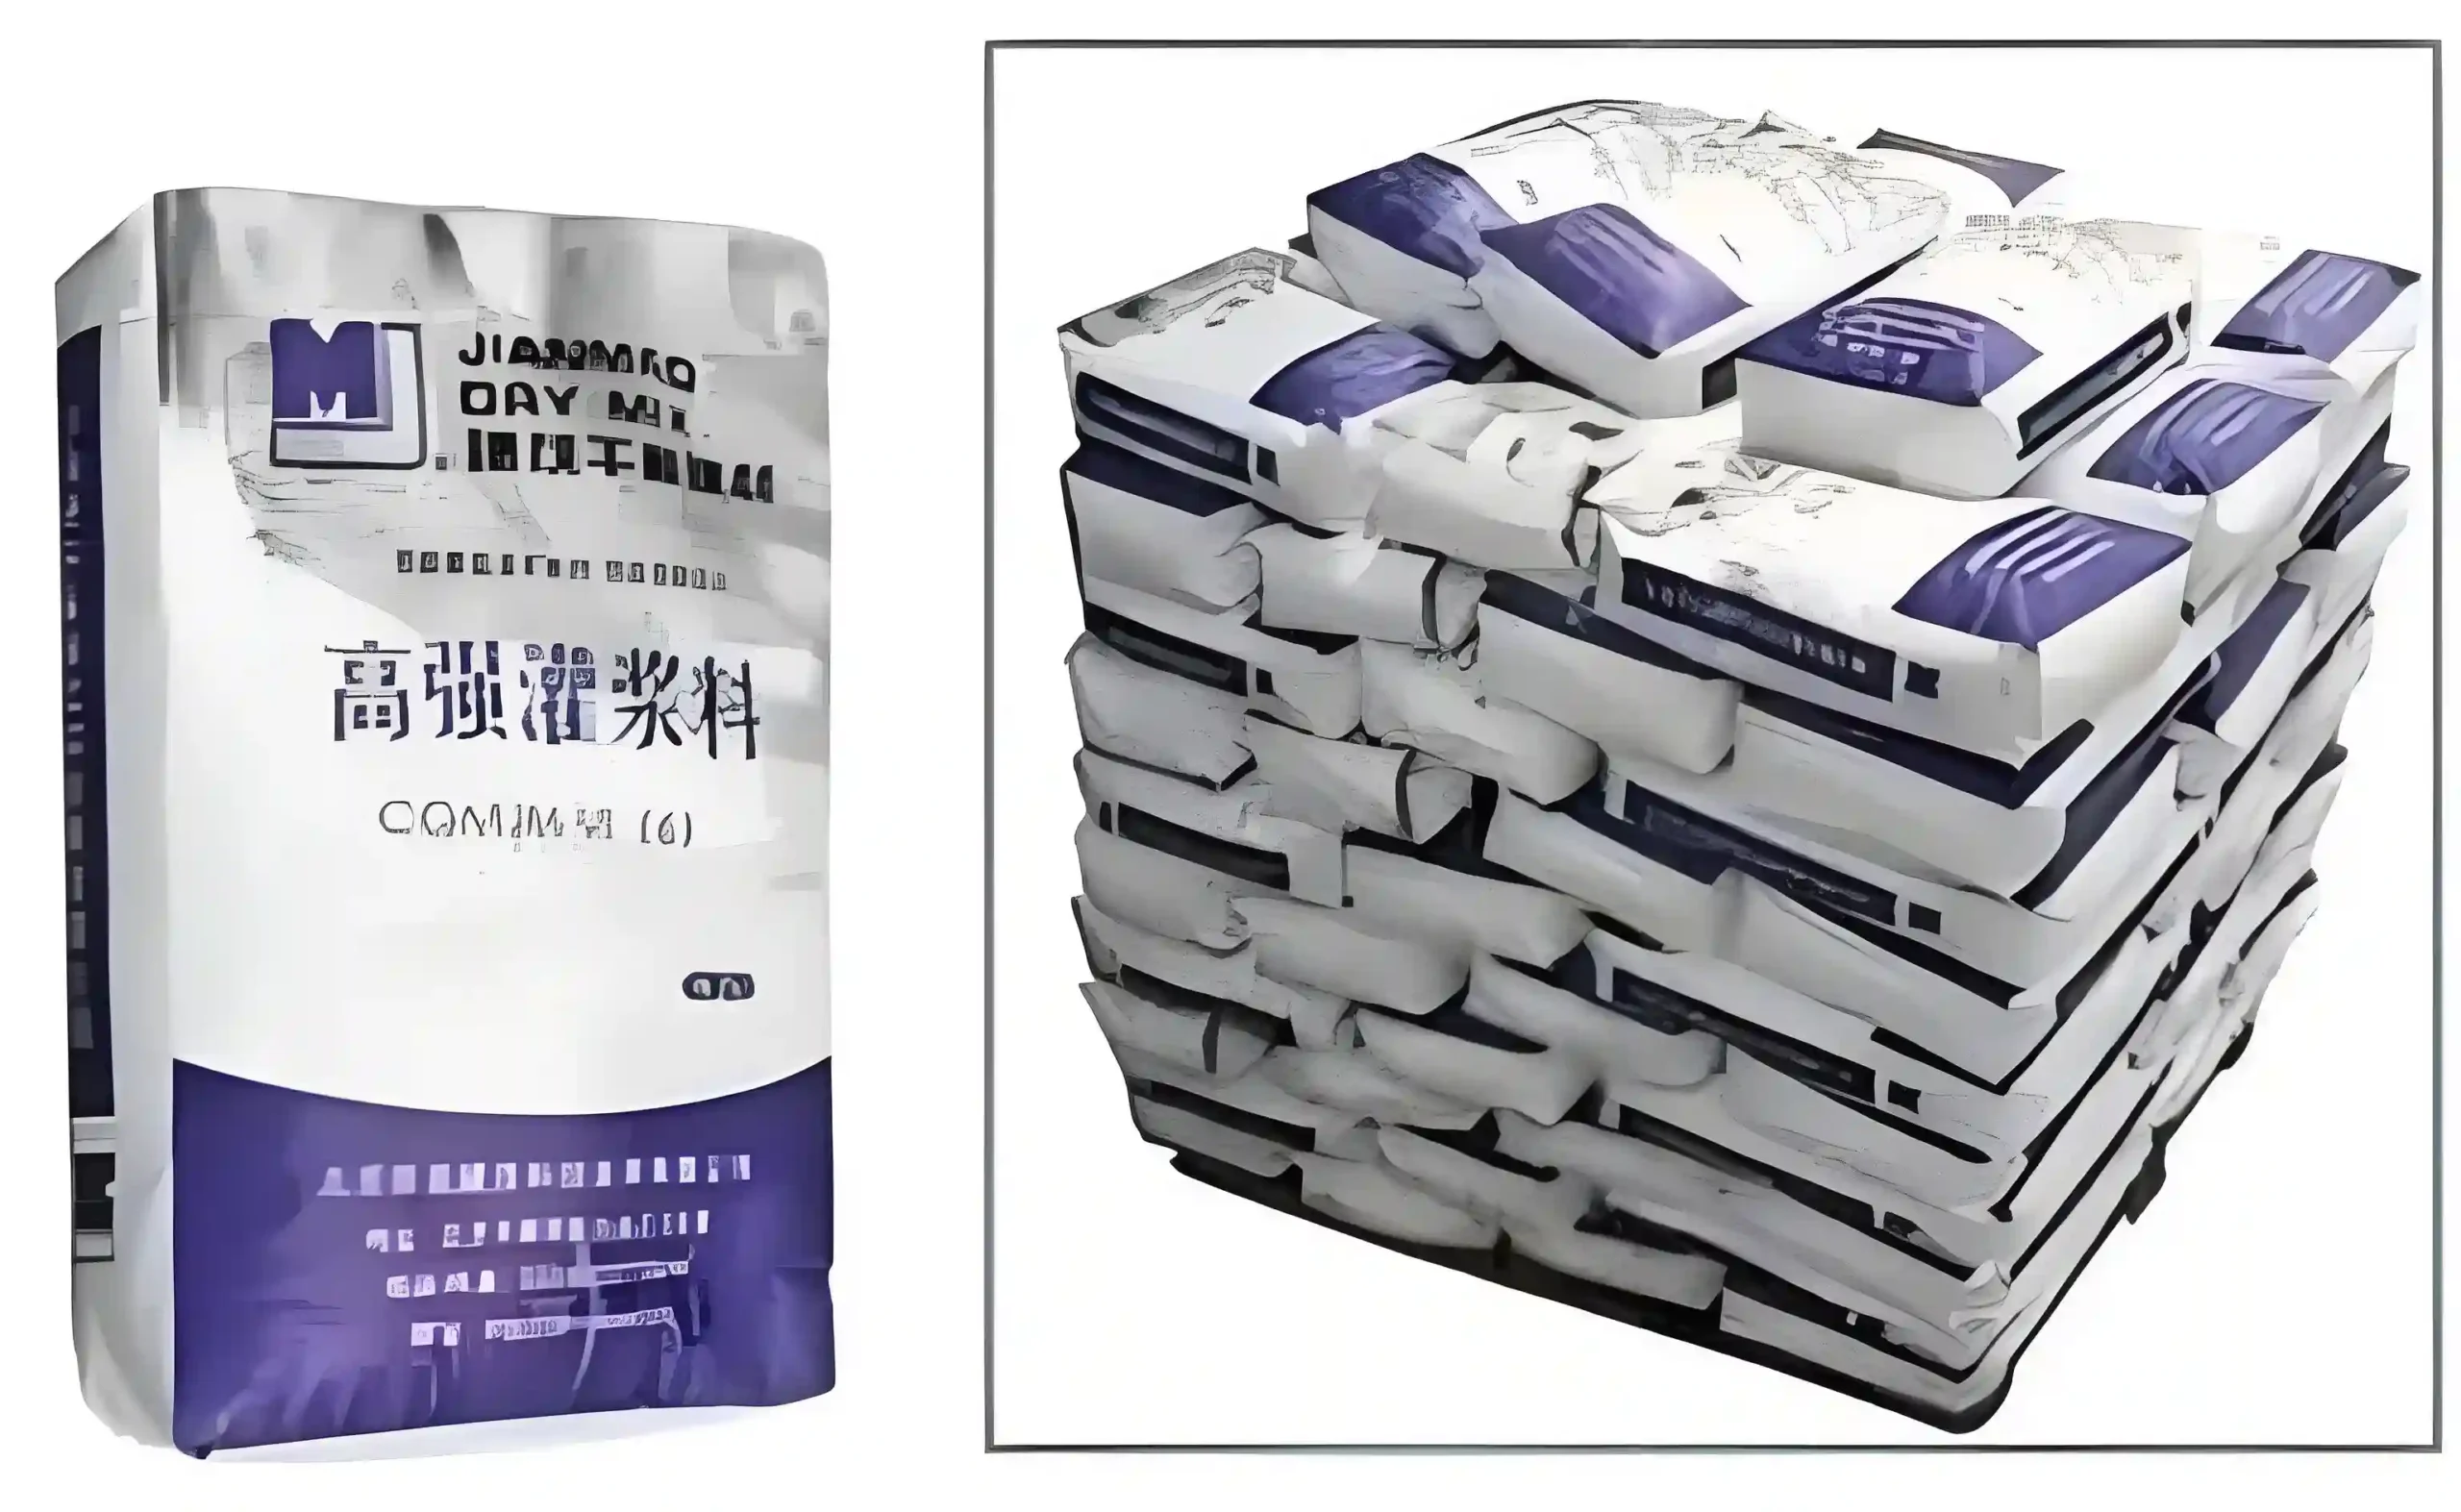
· Process 4:Grout Preparation (Critical Process)
1、particularly emphasized
Grout is the core product for grout connections. It is essential to select grout materials that have undergone type testing and are matched with the sleeves during component production and acceptance.
2、Quality Metrics
Basic Requirements—Compliant with Standard JG/T408 “Grout for Sleeve Connections of Reinforcing Bars”
Key focus for examination and verification:
- Adaptability to construction techniques. This involves verifying the pouring process for actual templates through mixing operations and pouring into simulated components; compatibility with grouting pumps must also be validated.
- Sensitivity to ambient temperature. Examples include workability (consistency over time) at summer temperatures above 30°C and early strength at winter temperatures below 10°C.
· Process 3:Essential tools for grouting material construction:

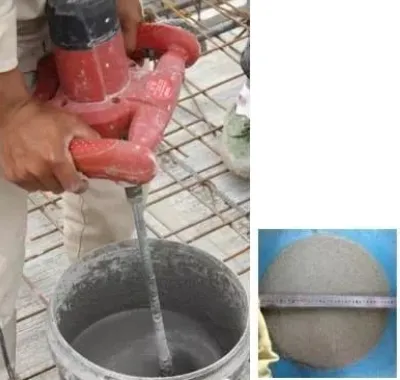
· Process 4:Grout Mixing
Water-to-Material Ratio – Strictly adhere to the water-to-material ratio specified in the factory inspection report for this batch of materials. Accurately weigh the grout material and water. It is recommended to use an electronic scale for weighing the grout material and a graduated measuring cup for measuring water. For example, a water-to-material ratio of 11% corresponds to 10 kg of dry material plus 1.1 kg of water.
Mixing Process:
- Add water first, then add ingredients;
- Mix with a mixer for 3–4 minutes until thoroughly uniform.
- After mixing, it is best to let the mixture stand for about 2 minutes to allow air bubbles to escape naturally.
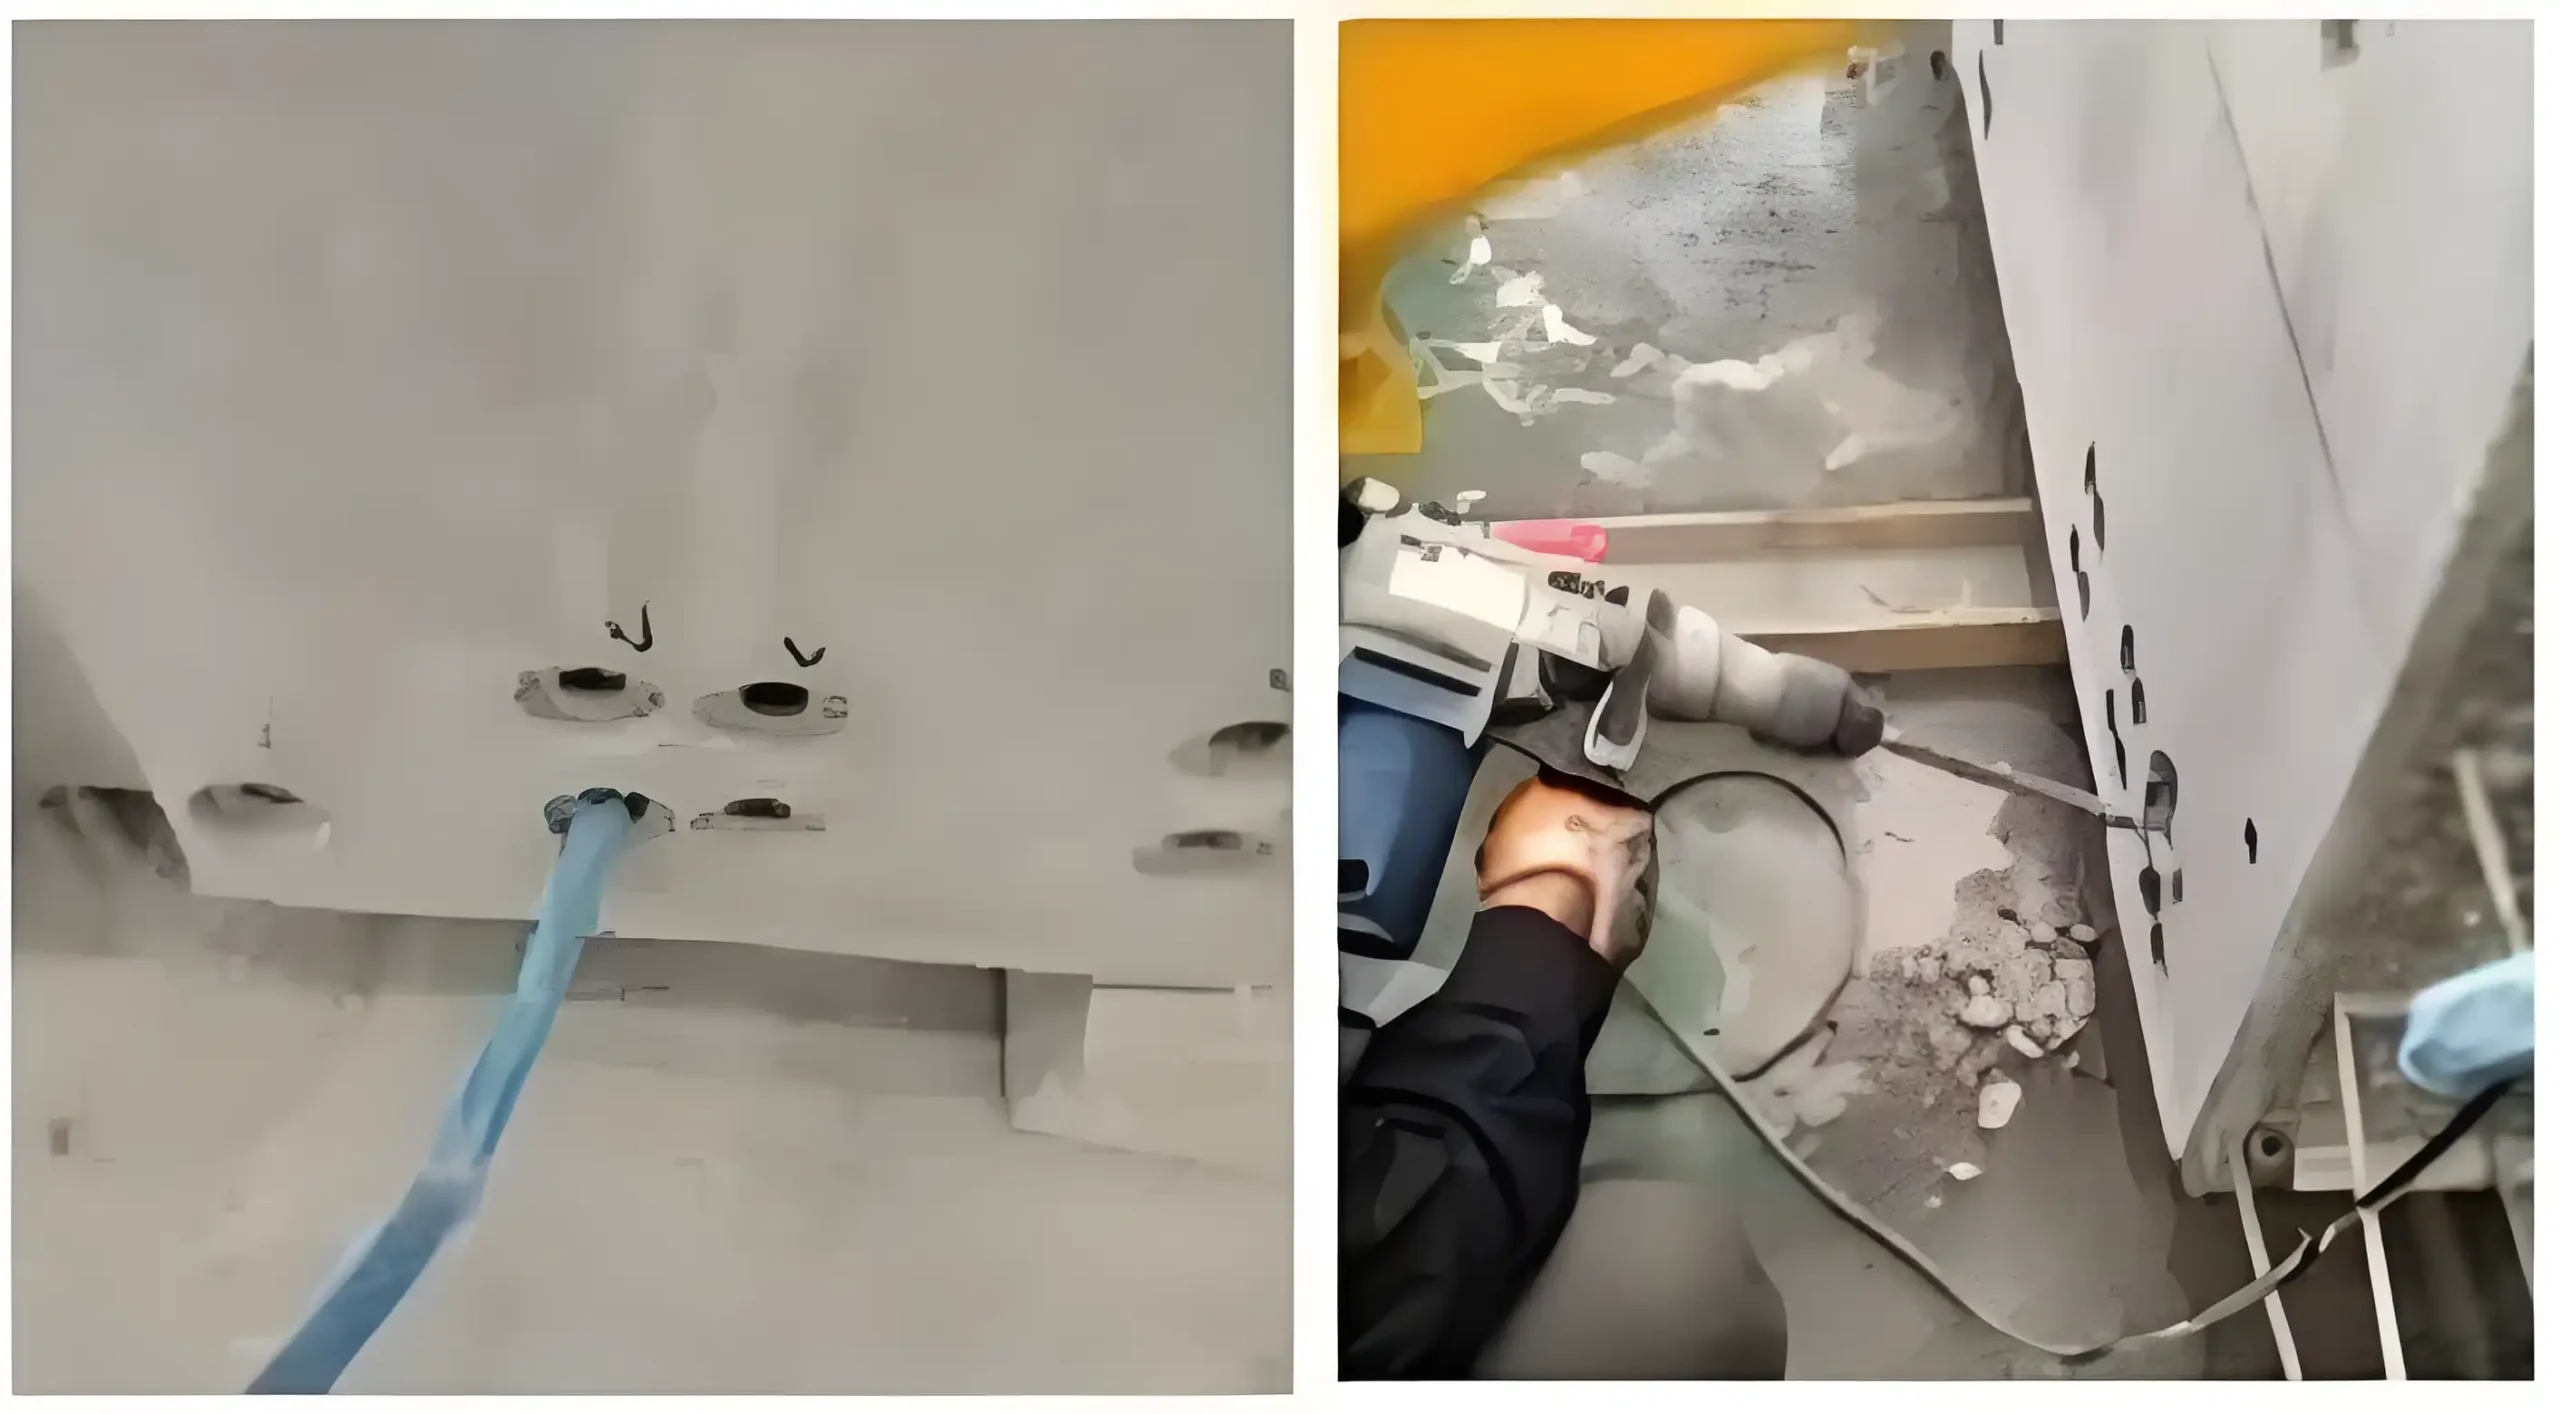
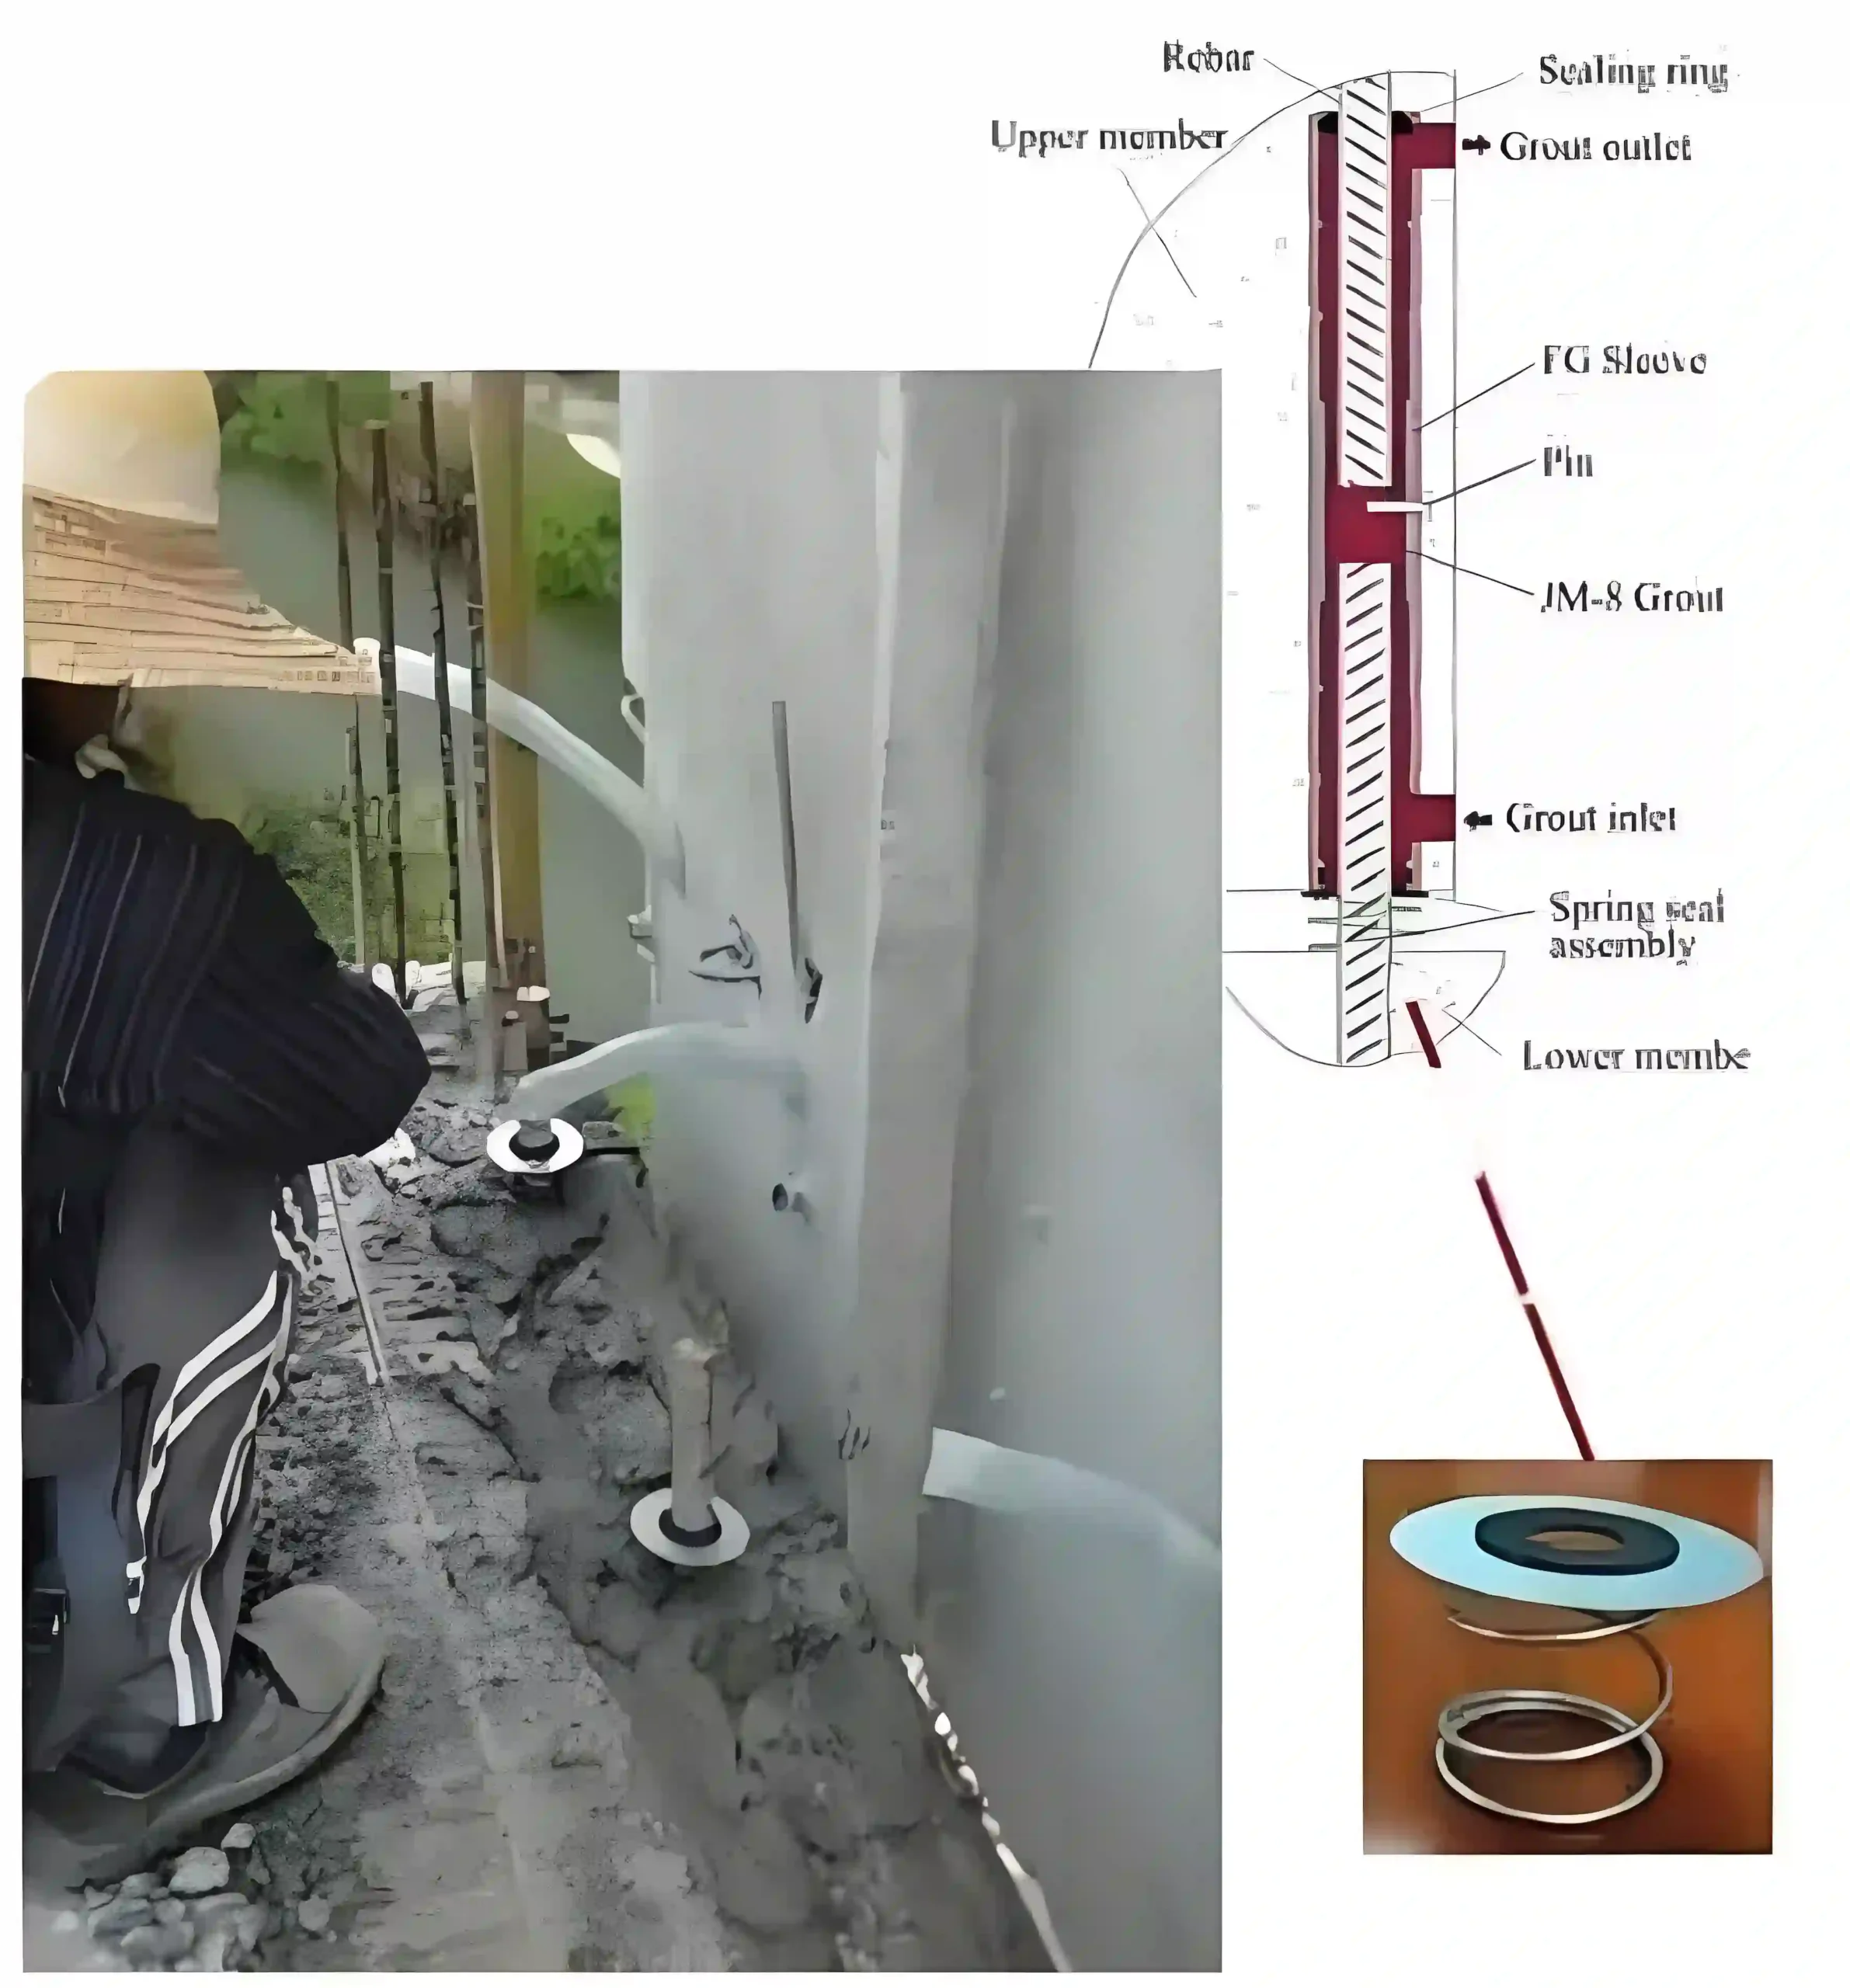
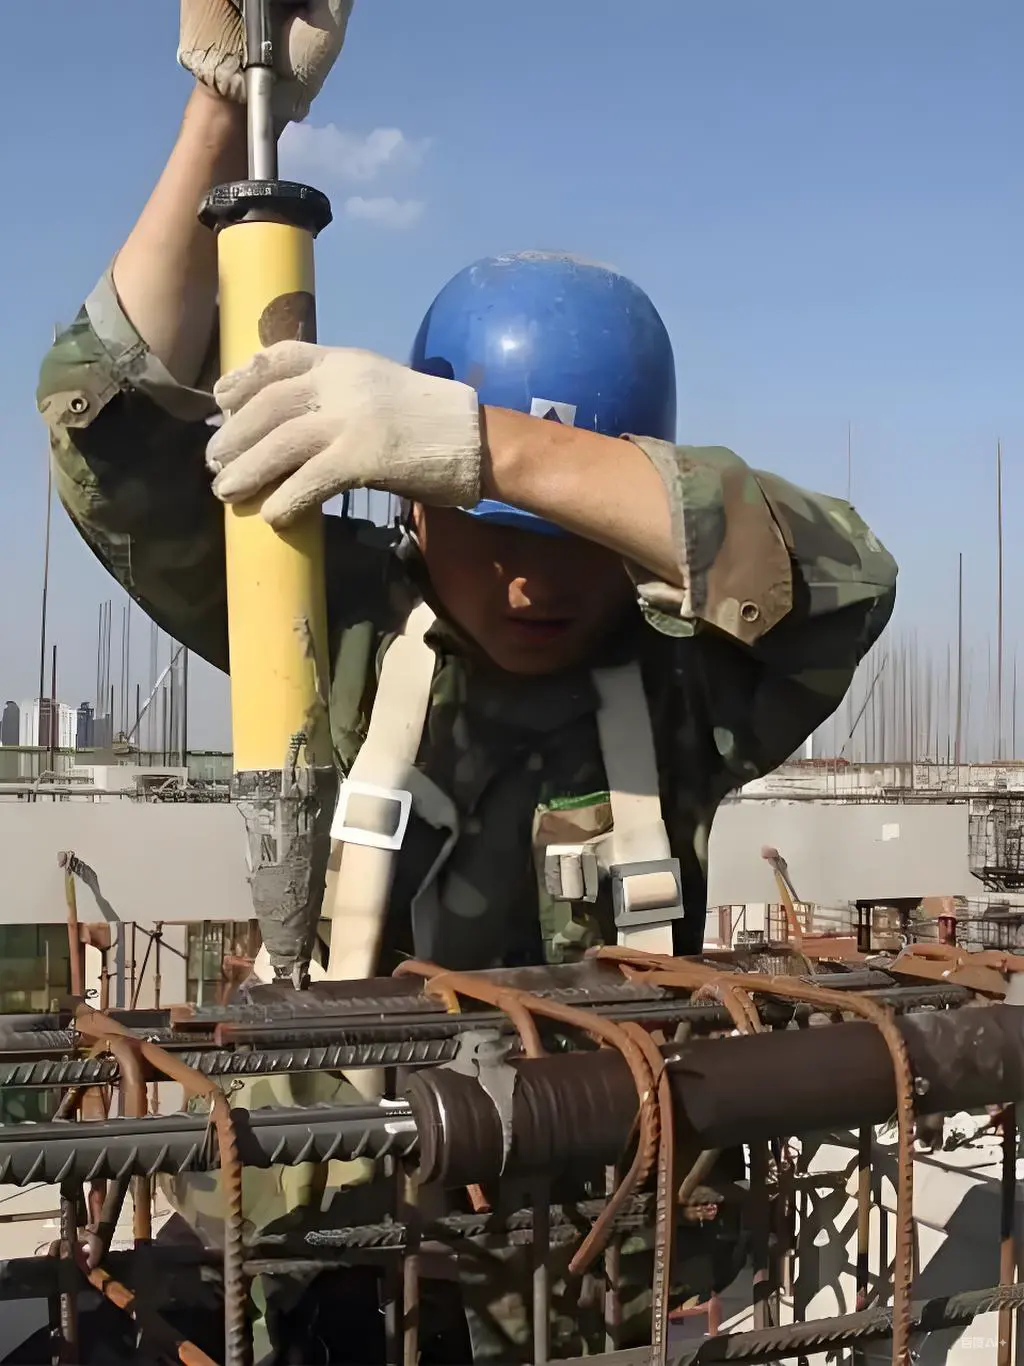
· Process 5:Grouting (Critical Process)
1、Grouting Construction
- For single sleeve grouting, a grouting gun may be used;
- For grouting multiple joints as a whole, an electric pump may be used;
- During grouting, pressure grout is injected into the sleeve through the lower grouting hole. Once grout flows out of the upper discharge hole, promptly seal it with a dedicated plug. Maintain grouting pressure during sealing. When withdrawing the grouting pump (gun) nozzle from the grouting hole, seal it immediately.
- It is strictly prohibited to grout the same compartment from two or more locations simultaneously (this may cause air pockets).
2、Grout Inspection
- Before the grout sets, inspect the joints that have been grouted. If any leakage is detected, address it promptly.
- After the grout has set, check the joint’s fullness.
3、If grouting is insufficient, it must be addressed as required.

· Process 6:Protection of joints after grouting
- At the start of grouting, simultaneously prepare strength test specimens for the grout material. Components must not be disturbed until the specimens reach a strength of 35 MPa (typically within 24 hours).
- Removal of support and formwork must be determined based on subsequent loading conditions.

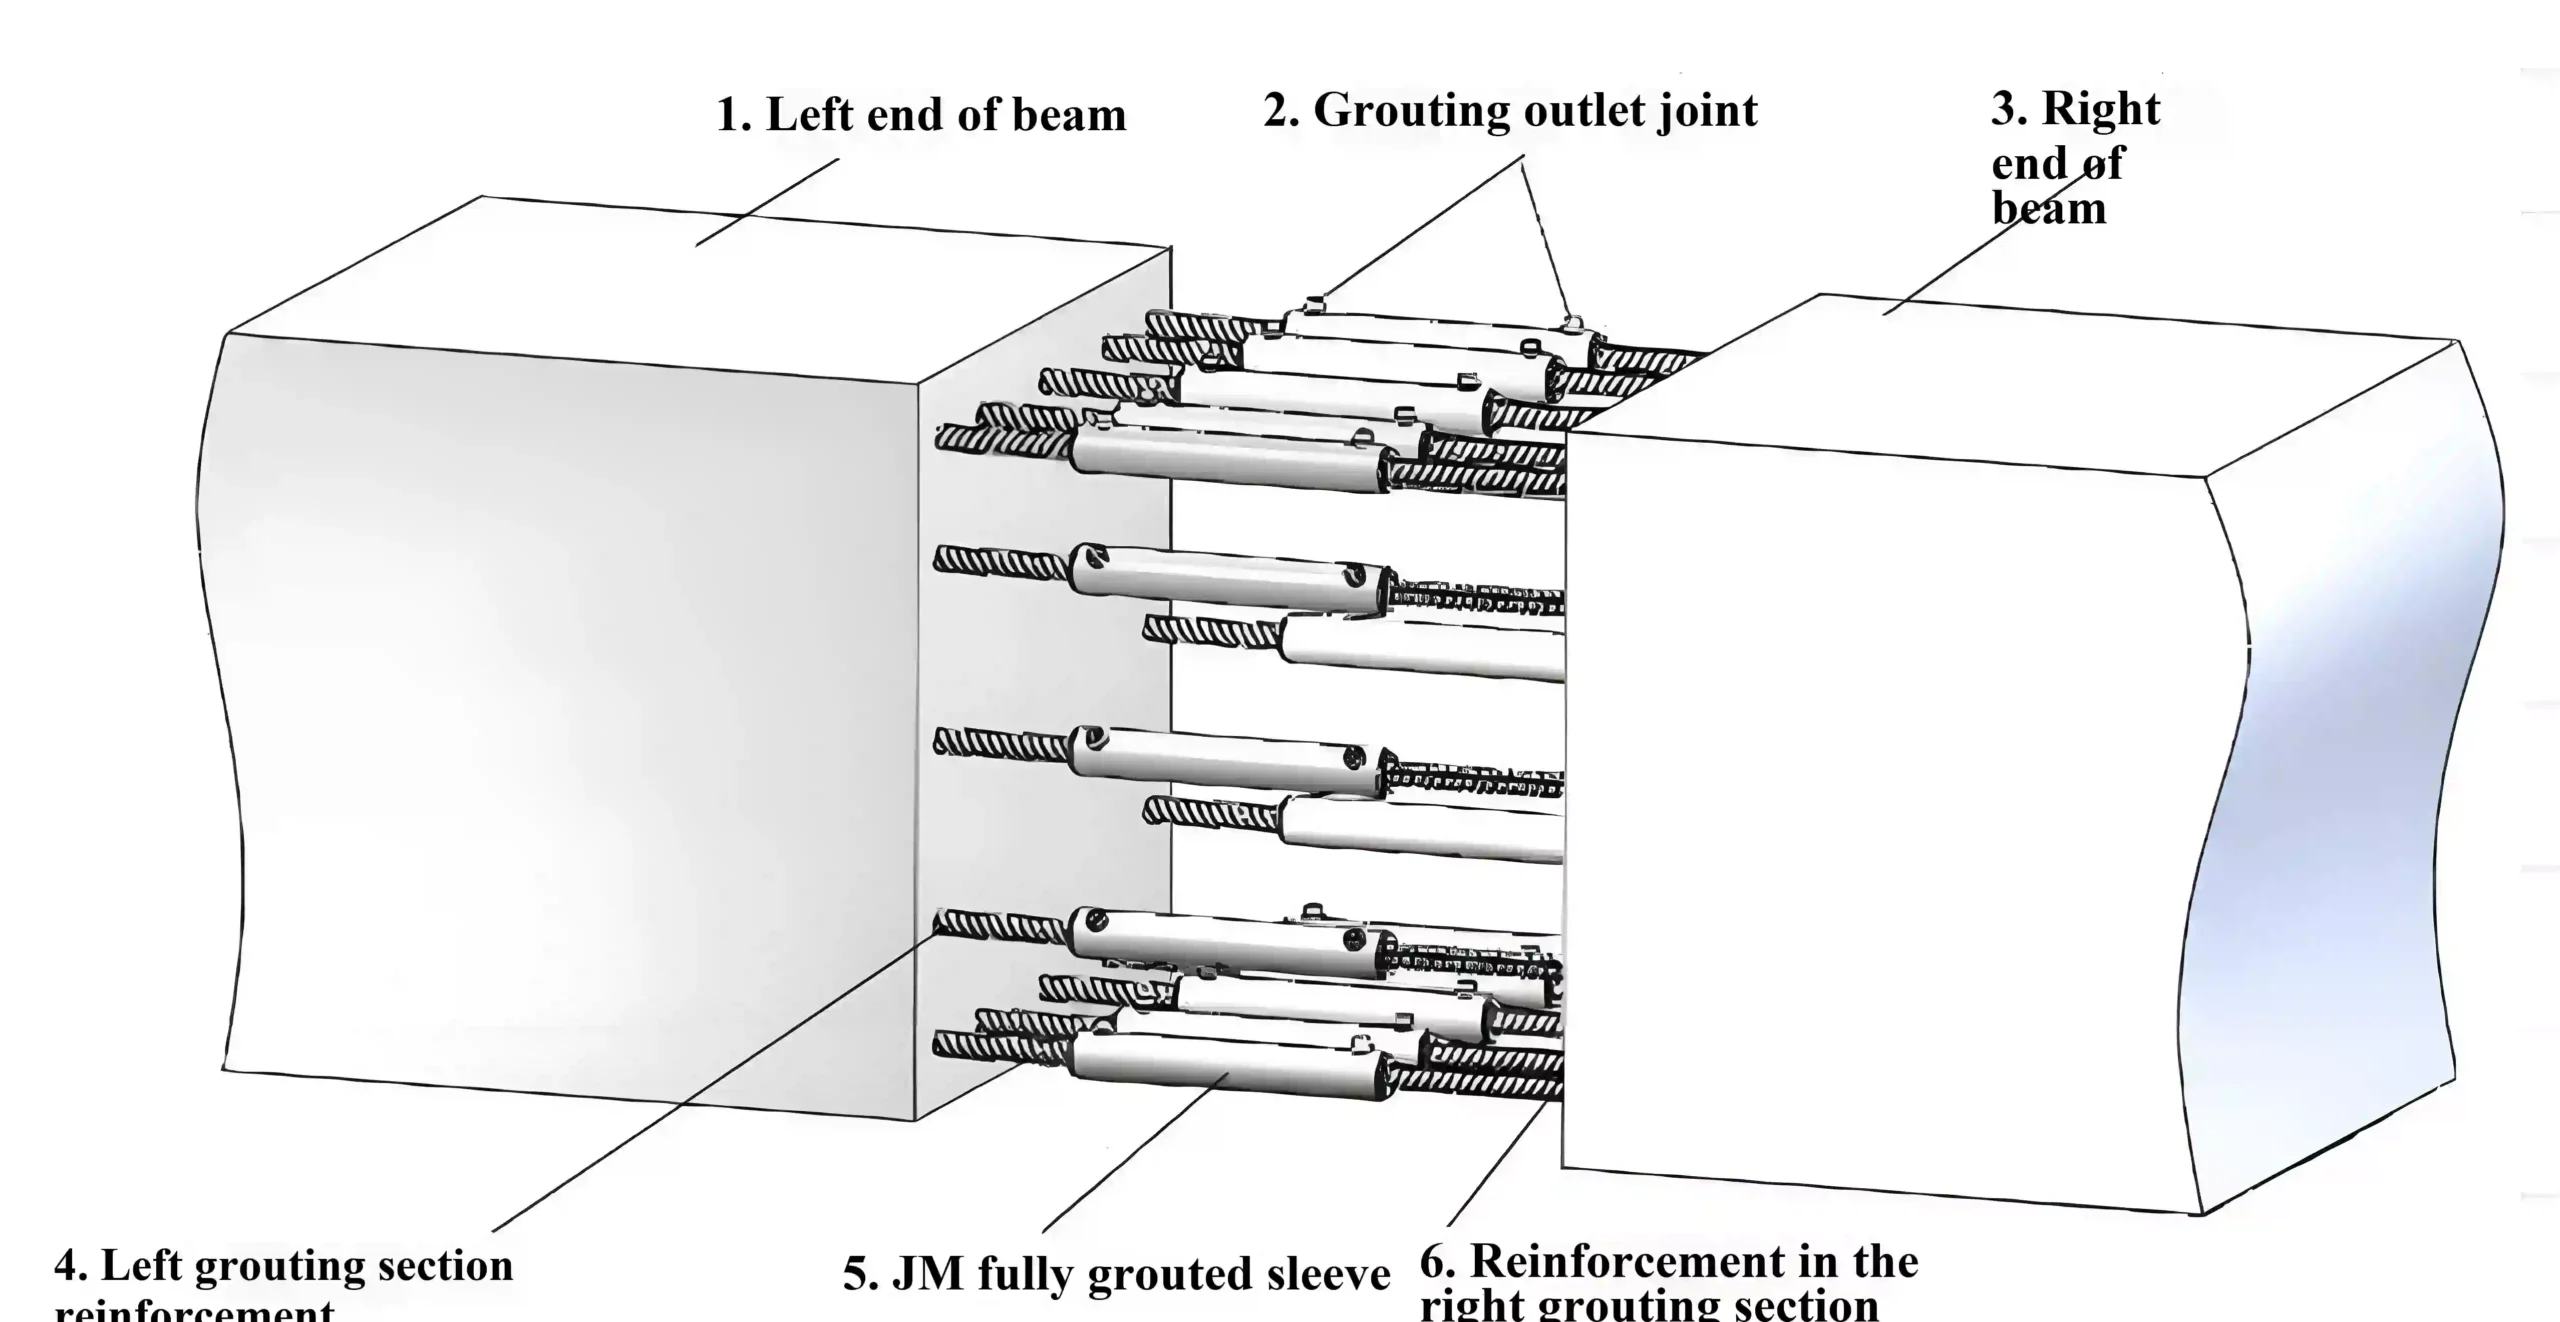
2.3、Grouting of Beam Sleeves at Installation Site
Operational Procedure
- Mark and install grouting sleeves
- Lift and secure components
- Position sleeves
- Prepare grout mixture
- Grout joints
- Protect joints after grouting
Key Process Steps: 4. Grout Preparation 5. Grout Connection
Products involved: Grout sleeves, grout material
Emphasis: Grouting personnel must undergo professional training and hold valid certification (as required by JGJ355 6.1.3).
· Process 1:Mark and install grouting sleeves
- Use a marker to mark the insertion depth of the connecting steel bars. The mark should be made on the upper part of the steel bar, ensuring it is clear and resistant to fading.
- Fully insert the sleeve onto the connecting steel bars of one side of the precast beam.

· Process 2:Lifting and securing components
- After components are hoisted into position according to installation requirements, secure them with supports.
- For components with lotus-root joints, ensure the base surface is clean and free of contaminants prior to hoisting.


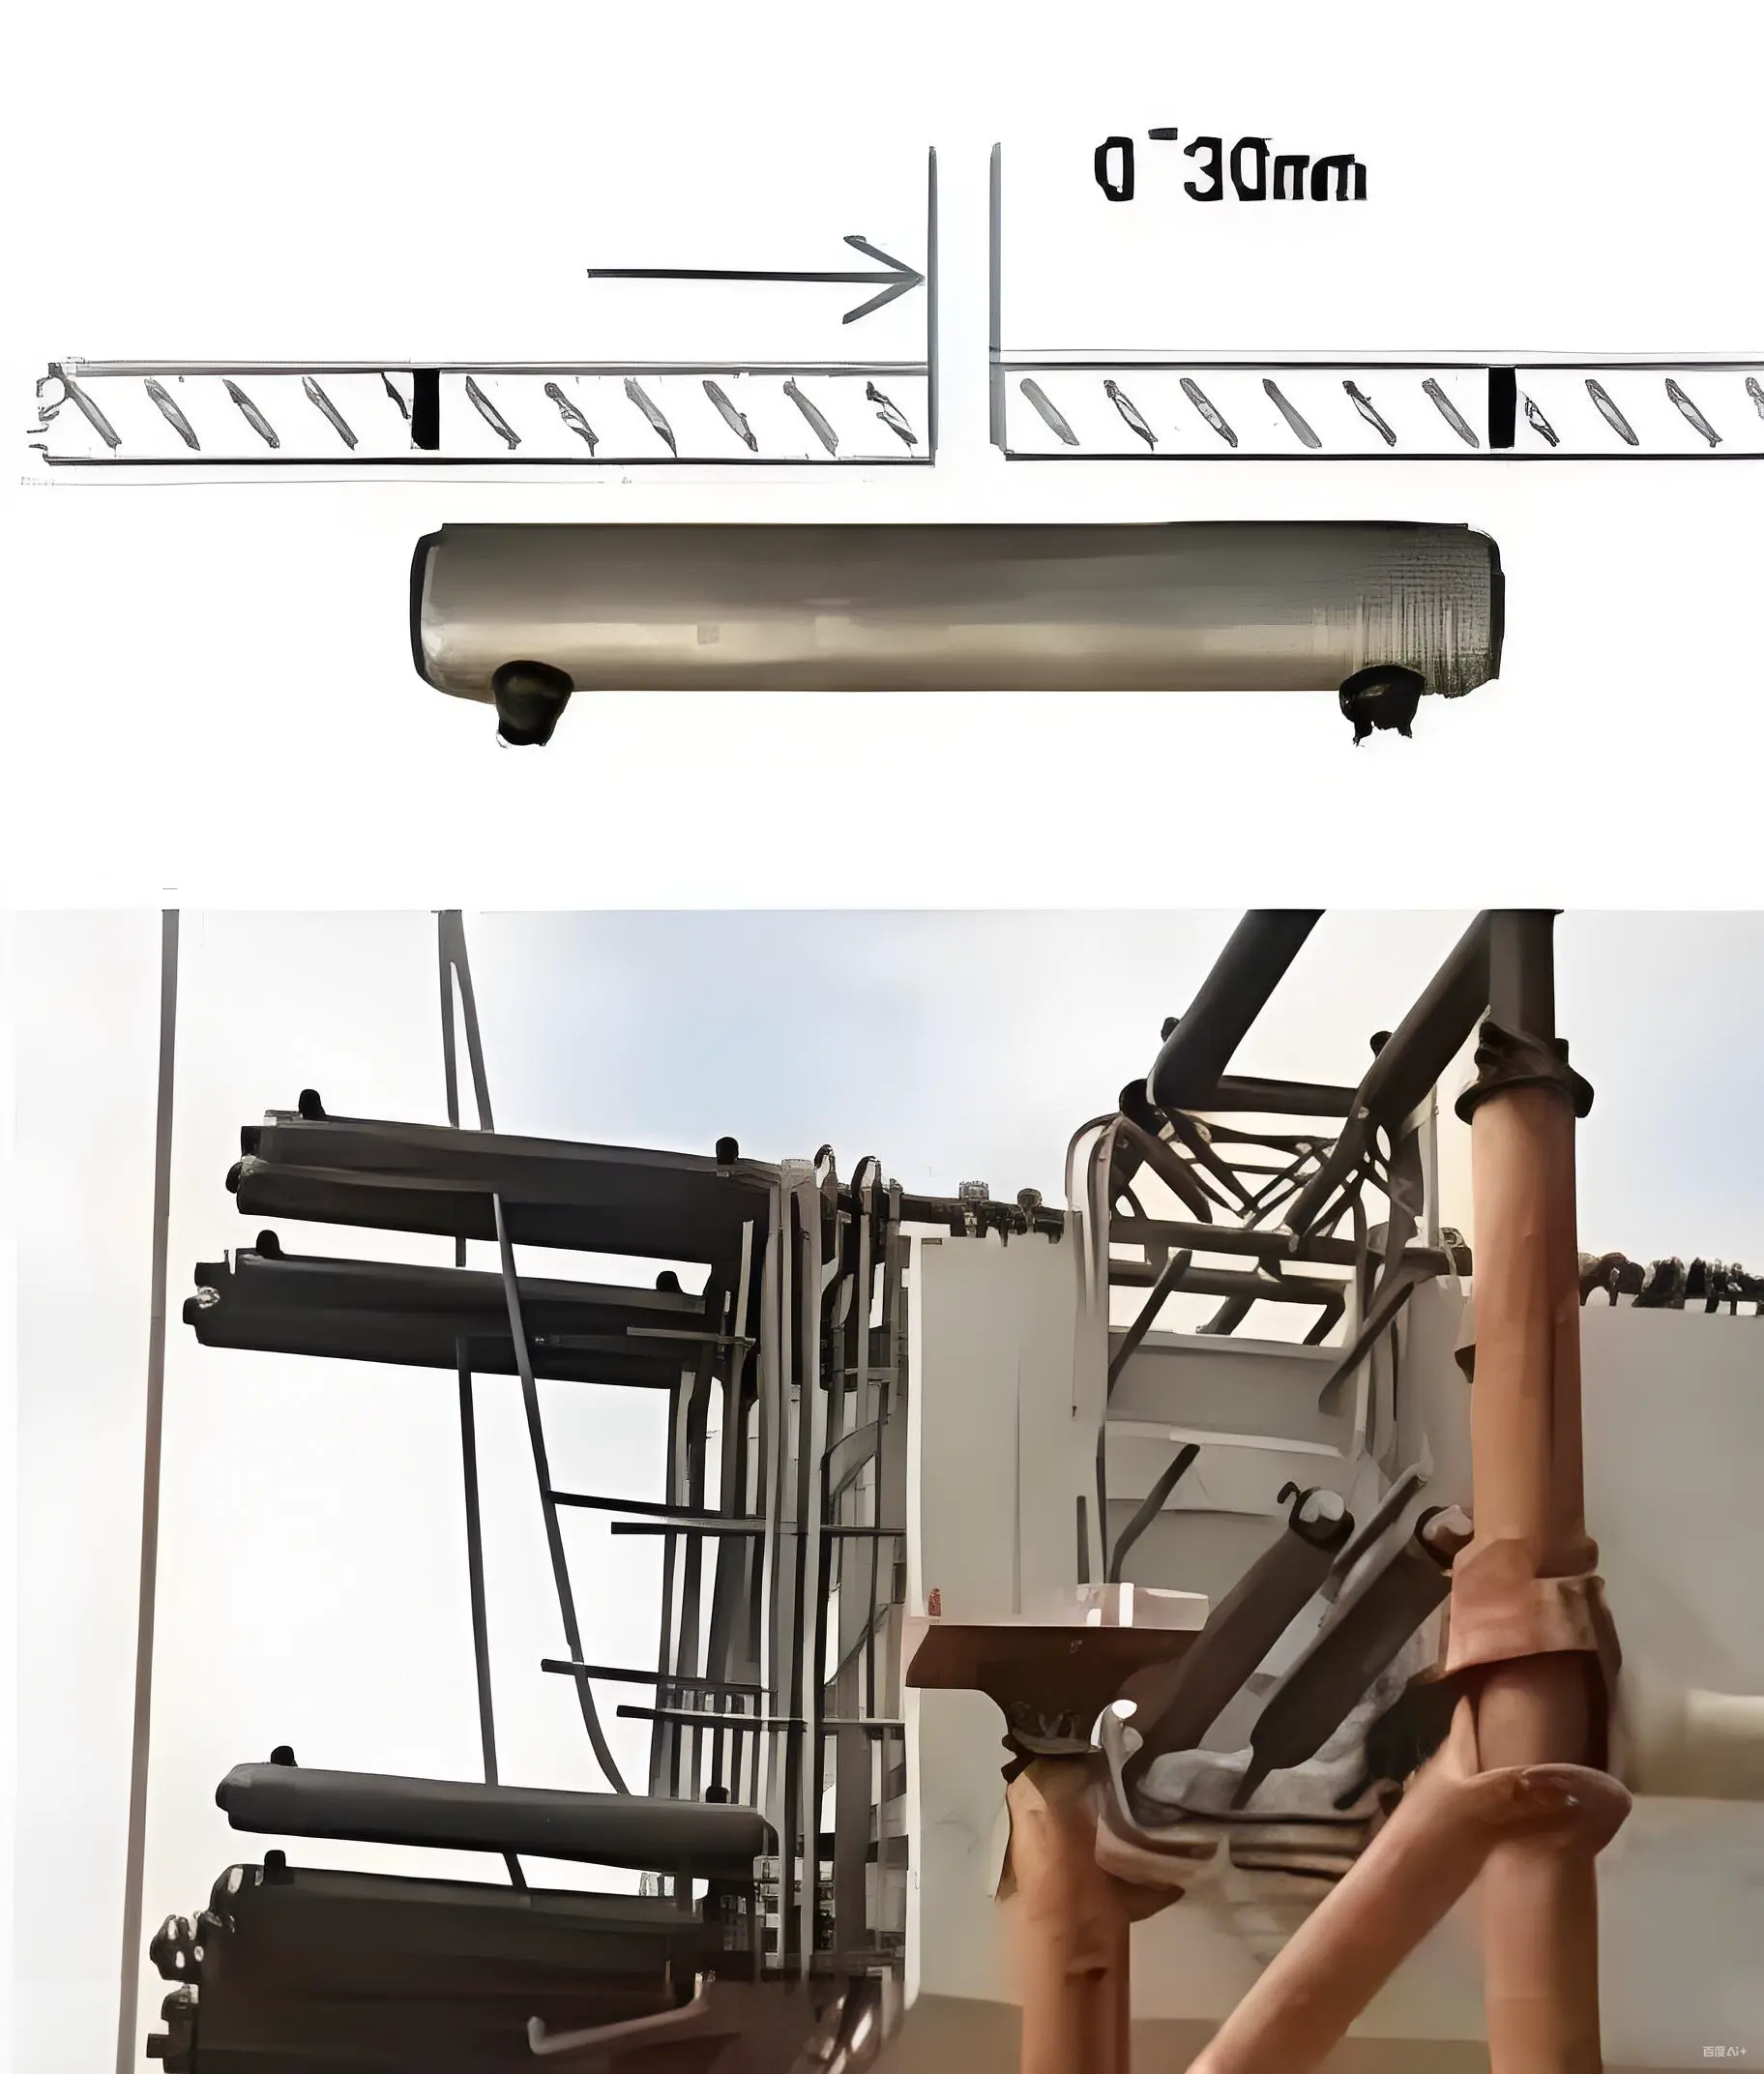
· Process 3:Sleeve in place
1、After hoisting, inspect the protruding reinforcing bars on both sides of the components awaiting connection.
- Alignment must be accurate, with deviations not exceeding ±3 mm;
- Spacing between components must not exceed 30 mm;
- Any deviations exceeding the specified limits require corrective action.
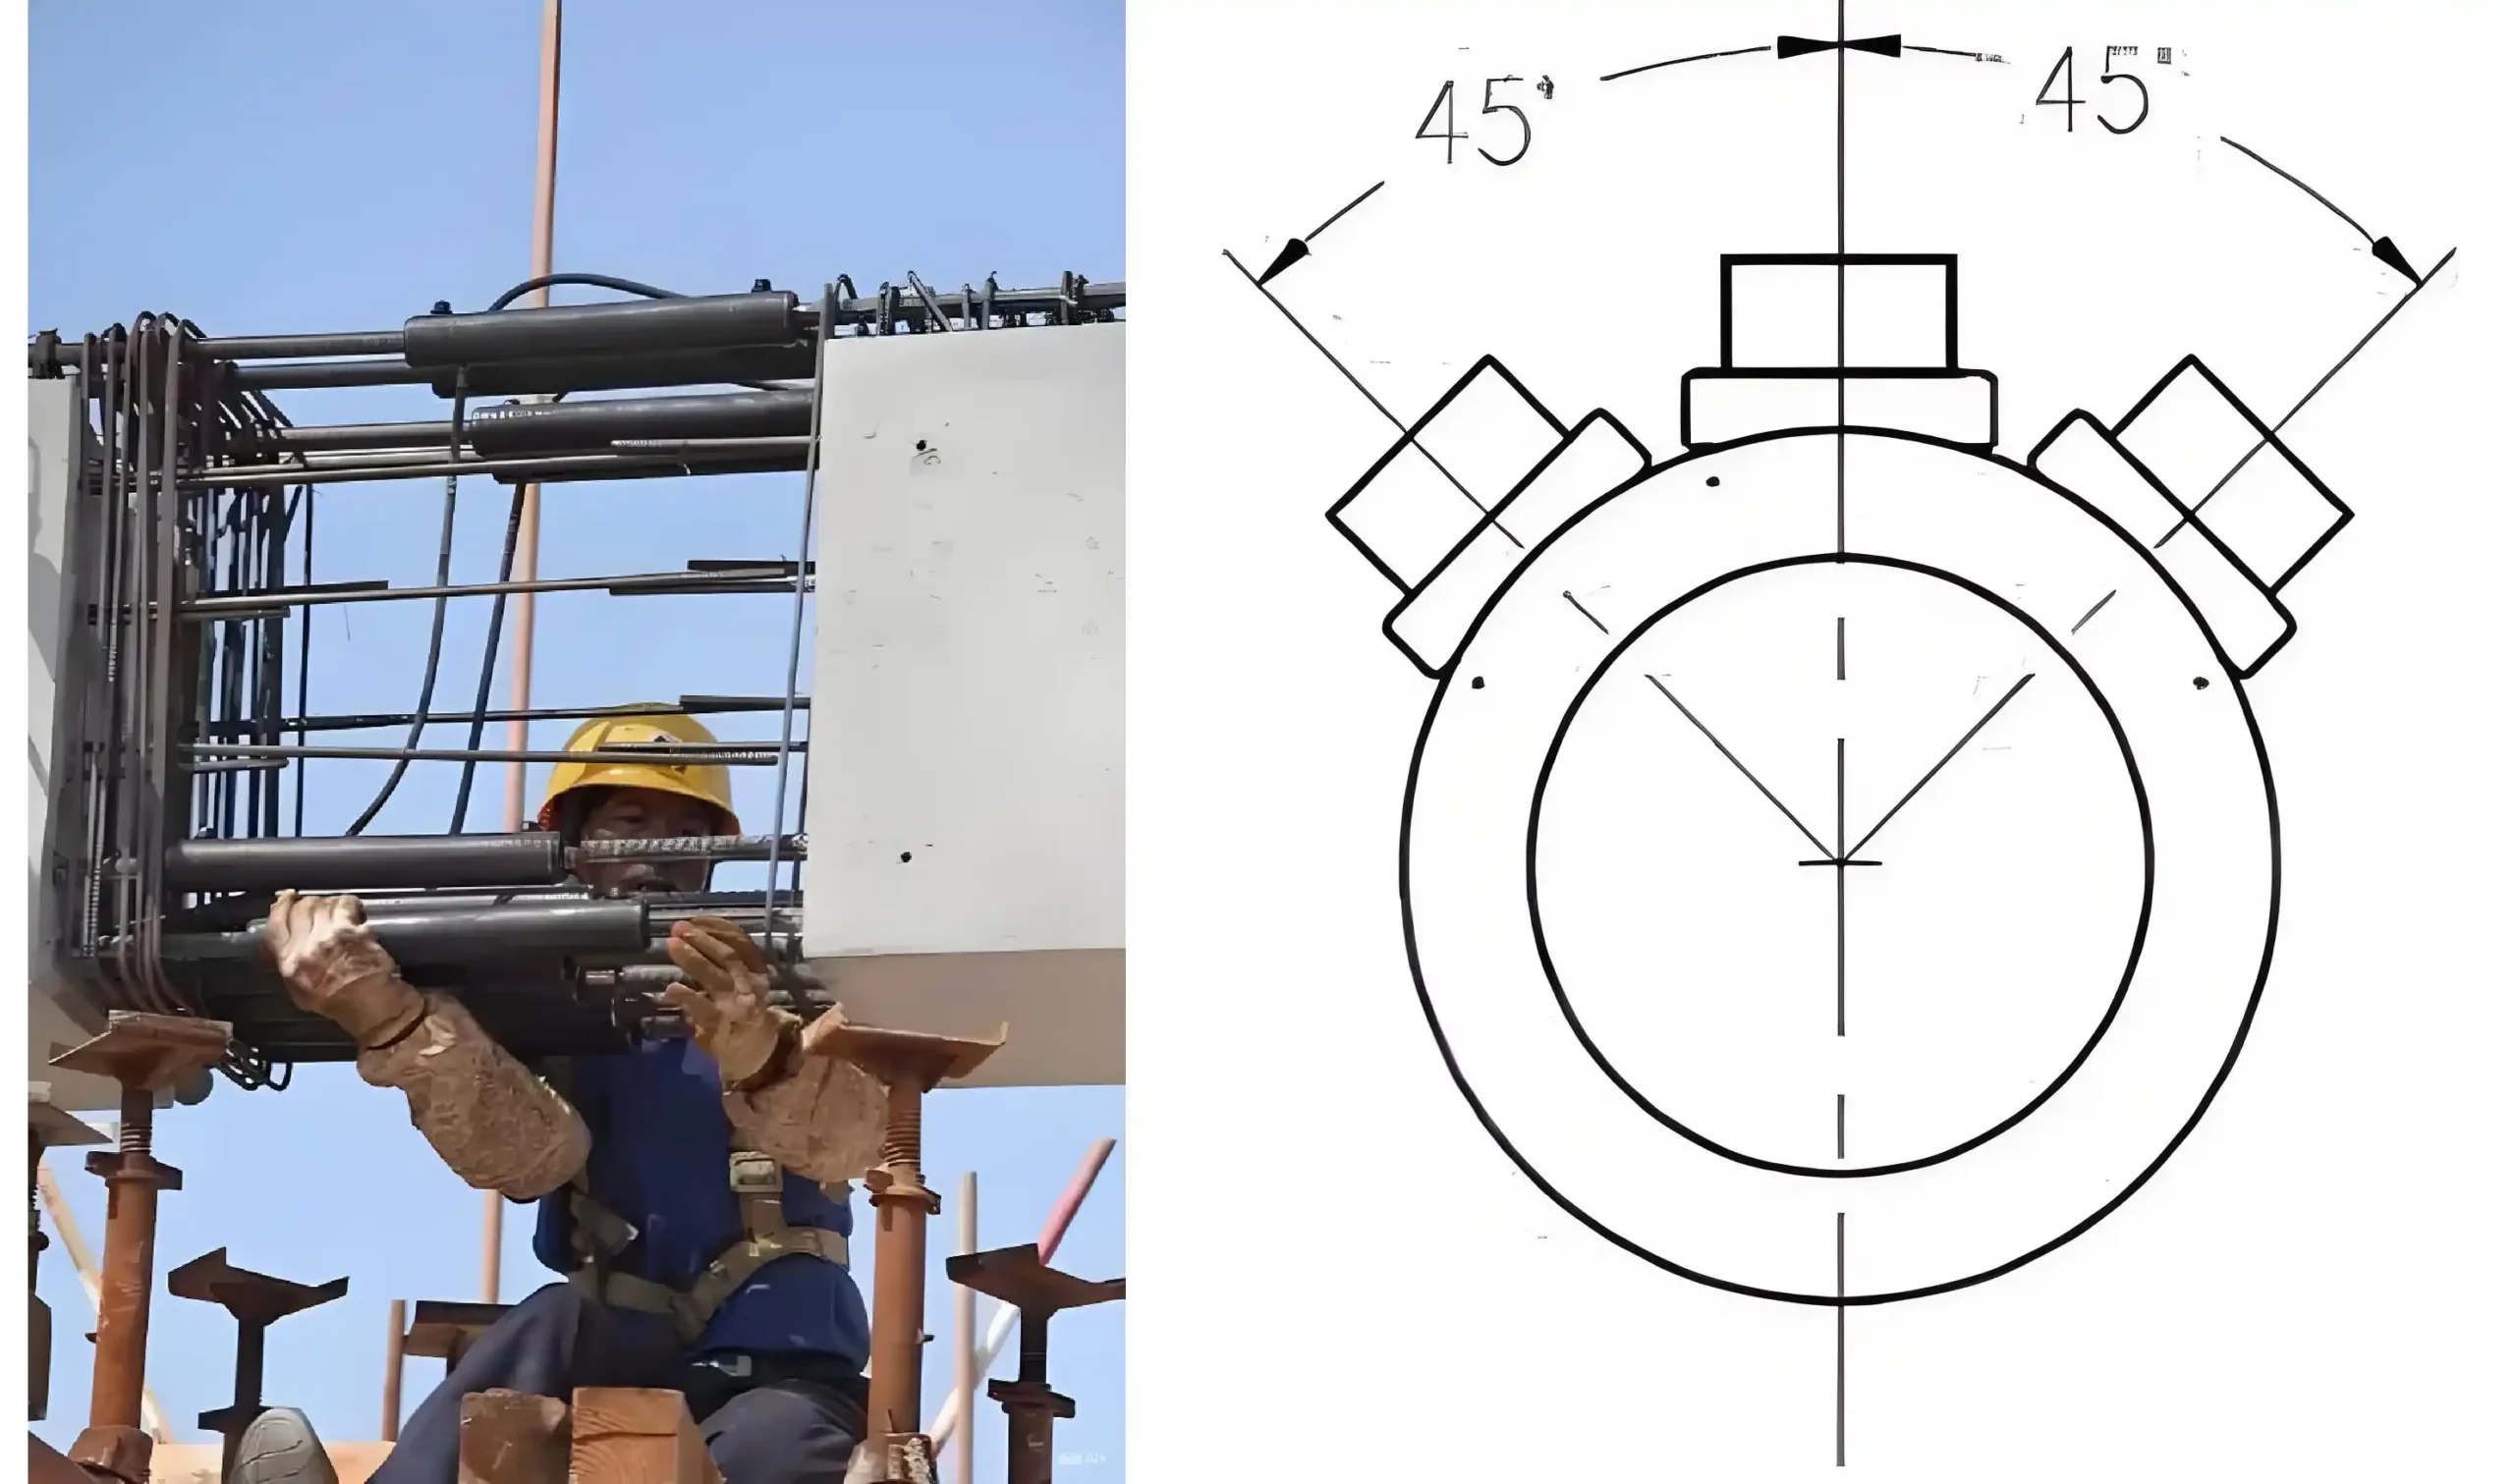
2、 Move the sleeve to the center between the two butt-jointed reinforcing bars according to the markings.
- Rotate the end with the grout injection and discharge joints to a position within ±45 degrees upward for ease of operation.
- • Inspect the sealing rings on both sides of the sleeve for integrity. If damaged, repair using a reliable method (e.g., wrapping with hard adhesive tape).
- • After positioning the reinforcing bars, tie the stirrups.

· Process 4:Grout Preparation (Same as Process 4 in Section 2.2)
· Process 5:Grouted Sleeve Connection (Critical Process)
1、Grouting
- Use a grouting gun to inject grout into the sleeve through one grouting port until grout flows out from the discharge port at the other end of the sleeve.
- After grouting, check for leakage at both ends and address promptly.
- Grout each joint individually.
- Grout must be used within 20 to 30 minutes after adding water and mixing to allow sufficient time for emergency adjustments.
2、Joint Fill Inspection
- After the grout has set, inspect the grout inlet and outlet ports. The top surface of the solidified grout should be higher than the upper edge of the sleeve.
· Process 6:Protection of joints after grouting
- Components must not be disturbed (i.e., no subsequent construction activities that disturb the components may be performed) until the strength of the synchronous grout test specimens reaches 35 MPa.
- Generally, the ambient temperature after grouting should be:
– Above 15°C: within 24 hours;
– 5°C to 15°C: within 48 hours. - The support and fixation of formwork shall be determined based on the design load conditions.
3、Summary
1、Sleeve grouting connections represent a critical technology in precast concrete construction. Through years of practical application, particularly this year, it has garnered significant attention across the industry. But how can this “attention” be translated into tangible results?
Key recommendations include:
- Government – Implement specialized policies to strengthen market access and oversight of technical products: Establish professional certification and training programs for grouting personnel.
- General Contractor – Coordinate the selection of sleeves and grouting materials, enforcing strict control. Prevent precast factories and construction units from operating independently during procurement, avoiding rushed non-compliant pairings.
- • Precast factories—Adopt a “factory-based” mindset, replacing the cm-level precision of cast-in-place with mm-level precision. Strengthen management of sleeve usage; operators must be trained before work and dedicated personnel assigned for quality control.
- Construction teams (lifting crews)—Strictly control grouting procedures. Select highly skilled personnel for grouting operations who have undergone training, and implement effective process monitoring measures.
2、Although considerable effort has been invested in researching and developing methods for inspecting grout quality, to date there remains no satisfactory inspection method suitable for engineering applications (an international challenge). Furthermore, inspection methods can only encourage construction improvements but cannot alter construction outcomes—that is, “quality is built, not inspected.” Therefore, process control is of paramount importance.
As previously mentioned, factory processing of rebar threaded ends and on-site grouting are key areas for quality control, with the primary challenge lying in on-site grouting. Practice has proven that as long as leadership at all levels prioritizes this, maintains a mindset of “small joints, big impact,” selects qualified products, and ensures all construction phases are controlled, grout connection requirements can be met!